30.03.2026
566
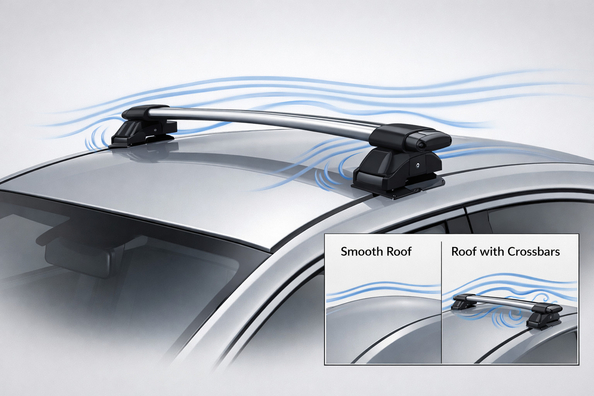
A whistle from a roof rack on a smooth roof almost never means that “something is wrong with the design itself”. Most often it’s aerodynamics: crossbars/rails create turbulence, and certain transitions and gaps work like an acoustic resonator. Add an incorrect installation direction, not-fully-tightened parts, or poorly seated seals—and the noise becomes noticeable at speed.
Below is how to quickly pinpoint the source of the whistle, the most common causes, what actually eliminates the noise, and what only temporarily masks the issue.
The air around bars and crossbars on a smooth roof accelerates unevenly. Where the flow “jumps” over an edge, hits mounting hardware, or passes through narrow gaps, repeated vortices form. Those vortices create a thin whistle or wind noise with a distinct frequency.
Importantly, the noise can be amplified not only by metal/plastic, but also by small details: end caps, rubber inserts/seals in the channels, their length, and whether the bars/crossbars are installed in the correct direction. Even a small “step” between parts often becomes the source.
The most common whistle causes usually come down to 3–6 scenarios: incorrect installation of crossbars/bars, gaps at airflow transitions, problematic seals, loose or improperly secured parts, and mounting vibrations at speed.
Start with quick localization. Your task is to find not an “approximate area”, but the exact transition/gap that produces the sound. A combination of visual inspection and a test drive with small changes works best.
| Symptom | Likely cause | What to do |
|---|---|---|
| A thin whistle that appears at a certain speed | Resonance at an airflow transition through a gap/micro-gap between parts or around a seal | Inspect the joints, cover the suspected transition with tape and repeat the test drive to confirm the exact point |
| Whistling gets louder when driving into the wind/on the highway | Not fully closed profile channel (end cap, looseness in the fit) | Check that end caps are installed and locked, and that there are no side gaps |
| Whistle + light rattling/clinking, or the sound “wanders” | Play in the mounting or under-tightened adjustment elements | Tighten fasteners per the instructions, do a short drive, and re-check |
| Noise appears after installing an accessory/changing the configuration | Installation mistake: wrong direction, poorly installed seals, incorrect clip seating | Reinstall the assembly per the manual: direction, seal seating, no gaps |
| The whistle has a “frequency” character, like it’s in resonance | An aerodynamic “whistle point” (transition between parts) or vibration of an individual element | Use tape localization: cover suspected areas one by one until the noise disappears |
The best results come not from “universal insulation”, but from correct installation and eliminating the specific aerodynamic transition. In many cases, the whistle disappears after correcting the installation direction, properly seating the seals, and eliminating gaps.
If you have another page for your mounting configuration, start with the material about the roof rack for a smooth roof—it’s usually easier there to cross-check mounting types and common installation mistakes.
Some “DIY” solutions can temporarily dampen the sound, but often don’t eliminate the root cause: air passing through a narrow channel or resonance at a transition. If the whistle returns after the very first trip, the cause is almost certainly incorrect geometry/fitment at the joint.
Accessories make sense when you’ve already confirmed the installation and the seating of seals/end caps are correct, but the noise remains. Then it’s usually about reducing wind noise (fairing/deflector) or replacing parts that can’t seat properly due to wear or mismatch.
If you’re considering wind-deflection solutions, pay attention to how they are supposed to affect the airflow in front of the rack and along it—not just “cover” it from above.
| Solution | When it works | When it’s not worth spending money |
|---|---|---|
| Reinstall bars/crossbars per the instructions (direction + fitment) | If the whistle appeared after installation or you suspect an orientation/fitment error | If all installation parameters have long been verified and the cause is definitely in a different area |
| Tighten fasteners + re-check after a short drive | When whistling is accompanied by rattling/clinking or the sound “wanders” | If the whistle is stable and clearly tied to a gap/airflow transition |
| Proper sealing: seals with no gaps + end caps | When there are visible gaps, incorrectly trimmed inserts, or open ends | When you’ve already done this correctly but the noise doesn’t go away |
| Temporary taping of a suspected transition for a test (localization) | You need to find the “whistle point” before buying accessories | Doesn’t solve the problem by itself—if you need an immediate long-term fix, after the test you’ll still have to restore proper fitment |
| Wind fairing/deflector (accessory) | When installation is already correct but noise remains; sometimes it reduces wind noise specifically | When the cause is specific gaps/open ends/incorrect installation: fix the geometry first |
| Replacing parts (seals/inserts/clips) instead of “patching” | If parts don’t seat properly or are worn/damaged | Not needed if you can restore correct fitment through proper installation and sealing |
A roof rack whistle on a smooth roof most often comes from aerodynamic resonance at a specific point: a gap at a transition, a poorly seated seal, open ends, or an incorrect installation direction. That’s why this algorithm works: localize the point (inspection + test drive + temporary taping) and fix the real gap/fitment, not just “add insulation”.
Verdict: start with installation and sealing (direction, torque, end caps), and only then consider accessories like a fairing/deflector. If you find the gap first and fix it, spending on “add-on gadgets” is usually either unnecessary, or becomes much more justified.
Choose the right option for a smooth roof and check common installation mistakes—the next logical step if the whistle still remains after the basic checks.
Shipping to EU
Wholesale and retail
Own warehouse
Опис продукту
Подарунки не надаються при оформленні покупки у кредит під 0,01% або при покупці частинами.