
































































 Author: Radomskyi Maksym Vasyliovych
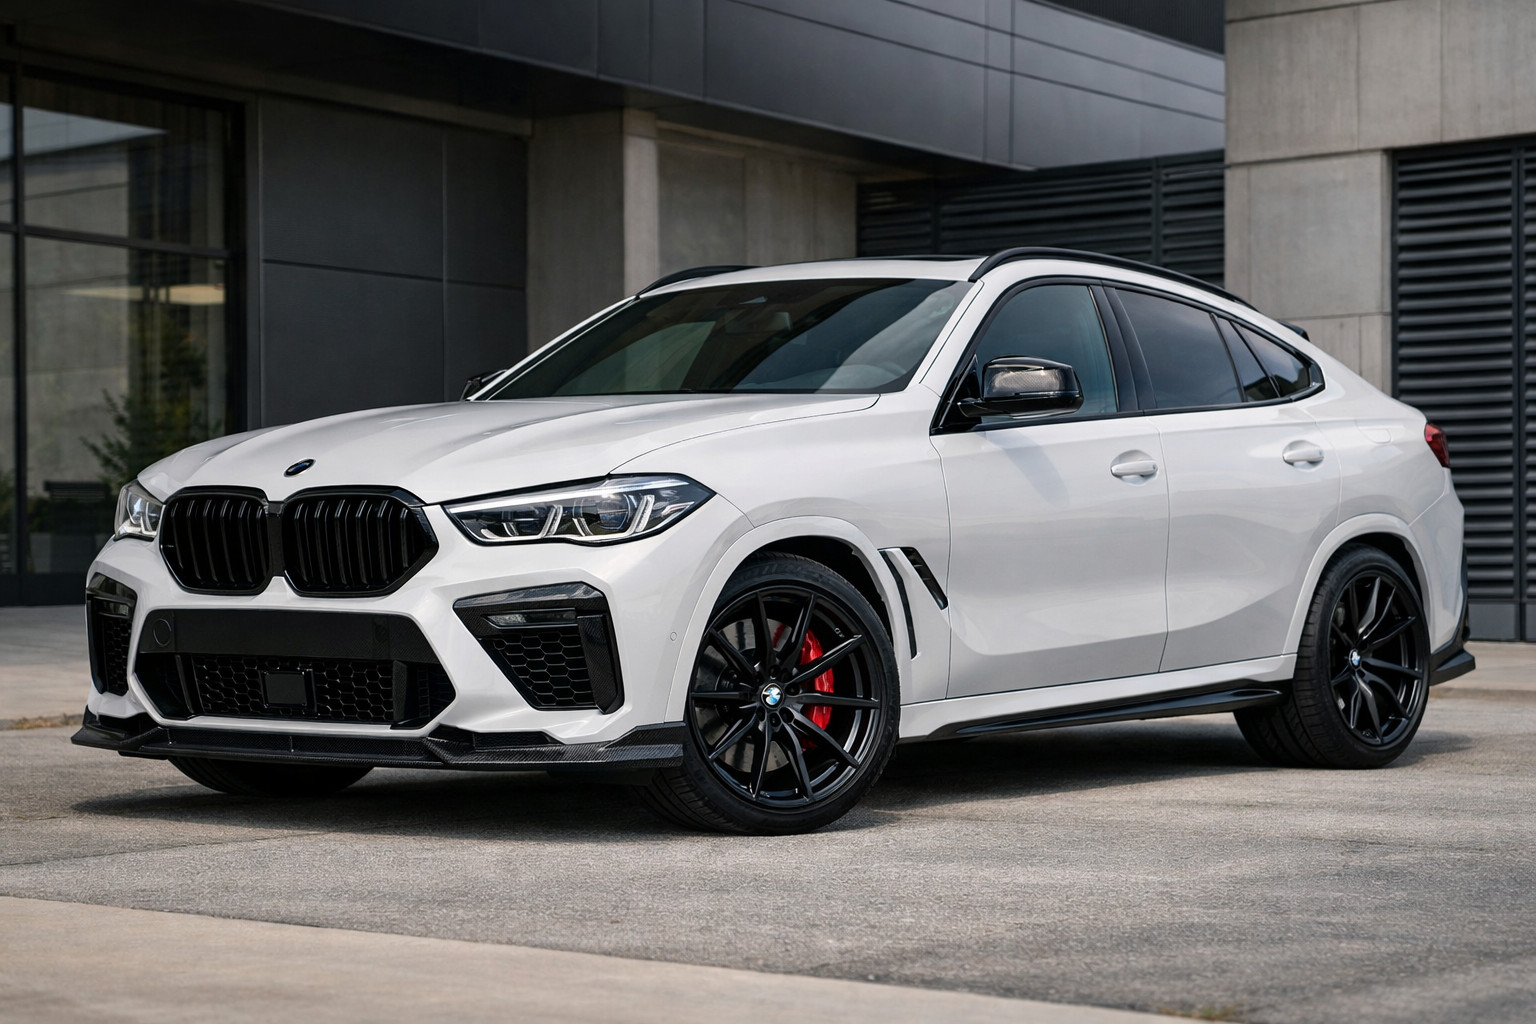
This plan is for a BMW X6 G06 owner who has just bought the car and wants to bring it closer to the X6M look without chaotic spending. The idea here isn’t to bolt on the maximum number of parts right away, but to get the right body proportions, a more put-together front end, and a more expensive-looking visual image in a few steps.
For the G06, what most often works is not a full body kit from the start, but a sequence: wheels and tires first, then stance, then black trim, and only after that aero elements. Separately, always check whether you have a pre-LCI or LCI, and whether the car has M Sport, because that affects compatibility for some parts and the point of certain upgrades.
What this upgrade needs to achieve
The main goal of this upgrade is to make the X6 look visually lower, wider, and more aggressive, without ruining everyday usability. If the car is driven daily, parked in the city, goes on the highway, and sees imperfect asphalt, an overly radical approach almost always creates more trouble than benefit.
It’s important to understand that the X6M image doesn’t rely on a single part. It’s created by the wheel-to-arch proportion, the body stance, a darker front end, and only then a spoiler, diffuser, or carbon. So the goal isn’t just to add trim, but to build an exterior logic so the car doesn’t look like a set of random elements.
What to do first
Step one is wheels and tires. If the BMW X6 G06 is used daily and the roads are average or poor, 21 inches is often a sensible compromise between looks and comfort. If the priority is maximum silhouette similarity to the X6M, 22 inches fills the arch more correctly, but they are harsher and more sensitive to road surfaces.
Step two is stance. Even a small height adjustment or very moderate work with wheel offset can pull the car together better than an expensive body kit. But heavy lowering and large spacers without precise measurements is a typical mistake: you can end up with rubbing, extra load on the suspension, and weird wheel geometry in the arch.
Step three is when it makes sense to do black trim on the front end and sides: grilles, individual chrome elements, contrast inserts. On the G06, this often delivers a fast visual effect, especially if the car originally looked too “civilian.”
Upgrade: why it’s needed and who it really benefits
| Upgrade | Why it’s needed | Who it really benefits |
|---|---|---|
| 21- or 22-inch wheel & tire set | Changes the body proportions, fills the arch, sets the right visual scale | Pretty much everyone who wants an X6M-style look rather than just a new small add-on |
| Moderate stance adjustment | Removes the “too tall” body feeling, makes the silhouette more cohesive | Those whose arches still look empty after changing wheels |
| Black front-end trim and de-chrome | Removes excess visual noise, makes the front end closer to the M look | Owners of cars without a pronounced dark package or with lots of chrome |
| Rear spoiler | Emphasizes the roofline and adds a finished look to the rear | Those who already have wheels and stance dialed in and want to finalize the silhouette |
| Diffuser and lower aero elements | Add aggression down low, but only work as part of the overall composition | Those who have done the базові steps and see value in adding detail |
| Steering wheel, mats, shift paddles | Provide a daily feel of a more cohesive cabin without risk to the body | Those who want to feel the upgrade every day, not only see it from the outside |
DD Tuning expert comment: the most common mistake on the BMW X6 G06 is buying a body kit before sorting out wheels and ride height. In the end the owner spends a lot, but the car doesn’t look cohesive because the arch is empty and the stance is too high. The second typical issue is ordering parts without checking whether it’s pre-LCI or LCI, and whether M Sport is included from the factory.
What makes sense to add in the second stage
Once wheels, stance, and dark trim are done, you can move on to aero elements. The most logical second stage is a front lower lip, side inserts, a rear spoiler, and a diffuser. In that exact order it’s easier to control the result and not turn the car into an overloaded project.
For the G06, body compatibility is critical here. On pre-LCI and LCI cars some elements differ, and for certain factory sets the base is M Sport. If parts are bonded on, plan the installation without rushing: the car needs time to settle after installation, and for the first day or two you shouldn’t wash the body or immediately load it with high-speed driving. For this type of factory retrofit elements, separate coding is usually not required.
What’s more about comfort vs. appearance
Some upgrades affect the exterior less, but feel great every day. For the X6 G06, that’s primarily the steering wheel, mats, interior trim, and sometimes shift paddles. They won’t turn the car into an X6M on the outside, but they add the right vibe when interacting with the car and don’t create risks with panel gaps or body-part compatibility.
The same group can include paint-protection film, ceramic coating, and some glass work. This isn’t about the X6M style itself, but about preserving the car’s condition. If the budget is limited, these items shouldn’t eat into the money set aside for wheels and stance, because those create the main visual effect.
What people often buy for nothing
Most often, people waste money on a full body kit while keeping stock, less-than-ideal wheels and a high ride height. In photos, individual parts can look convincing, but in real life, without the right base the car doesn’t become X6M-like. You simply get more plastic and carbon, not a cohesive image.
The second typical unnecessary expense is large spacers, heavy lowering, and cheap stick-on “carbon-look” pieces. The third is exhaust work at the start of the project, when visually it changes almost nothing. Another wrong step is immediately spending a big budget on a full body-protection package if the car’s exterior image isn’t put together yet.
What to install first, what to postpone, what isn’t mandatory
| What to install first | What can be postponed | What isn’t mandatory |
|---|---|---|
|
|
|
A ready upgrade plan for this scenario
- Check the car’s base configuration: pre-LCI or LCI, M Sport or not, what wheel size is currently installed, and how filled the arch is.
- Choose a wheel scenario: 21 inches if the car is daily-driven and road quality matters; 22 inches if the main priority is the closest possible X6M look.
- After wheels, do a moderate stance adjustment, but without extreme solutions and without large spacers at random.
- Then bring the front end and sides together in dark trim so the car stops looking visually busy.
- Next, add one or two aero elements: first a spoiler or the front lower lip, and only then the diffuser and small details.
- Only after that decide whether you need a major restyling kit or whether targeted body upgrades are enough.
- At the end, take care of the interior and body protection if the car is new and you want to preserve its condition.
When it makes sense to go for more expensive solutions
More expensive solutions are justified when the base is already dialed in and you clearly understand what you want to achieve. If you don’t want a step-by-step build but an immediate cohesive body result, it makes sense to look at the X6M restyling kit. This is especially logical for those who don’t want to assemble the project in parts and are ready to invest in a larger exterior package right away.
A separate budget makes sense for 22-inch wheels if the car mostly drives on good roads and correct proportion matters more than ride softness. And body aero elements are worth buying in a higher-quality version when you need precise geometry for a specific bumper and don’t want to redo mounting points, adjust joints, or live with uneven gaps.
From a client’s experience: after buying a G06, the owner initially wanted a full X6M-style kit right away, but the car was driven daily in the city and on the highway. In the end, he started with the right wheels, a moderate stance adjustment, and dark front-end trim, and added the spoiler and diffuser later. The biggest difference didn’t come from the most expensive body kit, but from the car having the right proportions and no longer looking too tall in the starting configuration.
Conclusion
For the BMW X6 G06, the path to an X6M look is almost always the same: wheels and tires, then stance, then dark trim, then aero, and only at the end the interior or a major restyling kit. This order delivers the biggest effect for the money spent and doesn’t force you to overpay for parts that don’t work without the right base.
This material is based on real selection experience, hands-on practice, and real-world usage scenarios. That’s why the priority here is not flashy names for upgrades, but compatibility, a logical installation sequence, and an understanding of what truly changes the BMW X6 G06—and what remains a secondary decorative expense.
How it works
- Check the car’s baseline First, determine whether you have a pre-facelift or LCI, and whether it has the M Sport package. This affects the compatibility of some parts and which upgrades actually make sense.
- Choose the right wheels and tires Start with the wheels: 21 inches is a good everyday compromise, while 22 inches will give a silhouette closer to the X6M. The wheels themselves make the biggest difference to the body proportions and fill the arches.
- Make a moderate stance adjustment After the wheels, choose a slight lowering or another very careful ride-height adjustment so the body looks more planted. Avoid extreme lowering and large spacers without exact measurements.
- Add black trim to the front and sides Once the base is sorted, move on to de-chroming, black grilles, and contrasting inserts. This quickly removes visual clutter and brings the car closer to an M-style look.
- Then install aero elements Only after the wheels, stance, and trim should you add a spoiler, front lip, diffuser, and side inserts. For the G06, it is especially important to check part compatibility with the pre-facelift or LCI, and not to rush the installation by washing the car or driving aggressively in the first few days.
- Finish with the interior and body protection Once the exterior look is complete, you can add a steering wheel, floor mats, paddle shifters, or other small interior upgrades. If the car is new, this is also a good time to consider film or ceramic coating to preserve its condition.
Pros and cons
The first steps recommend wheels, tires, and a moderate ride-height correction — this is what changes the X6 G06 proportions the most and makes it visually closer to the X6M. This approach delivers a noticeable effect without needing to buy an expensive body kit right away.
The upgrade sequence is built logically: first the base, then the black trim, and only after that the aero elements. This helps avoid assembling the car from random parts and preserves a cohesive look.
The author also separately considers daily usability: for bad or average roads, 21-inch wheels are recommended as a compromise, while 22-inch wheels are only for when the silhouette matters more. This makes it possible to choose a solution for real conditions, not just for photos.
There are clear warnings about compatibility with pre-LCI, LCI, and M Sport versions, which reduces the risk of buying unsuitable parts. This is especially useful for those who do not want rework or fitment problems.
Interior and body-protection upgrades are highlighted separately; they do not affect the silhouette, but they add daily comfort and help preserve the car’s condition. This makes it possible to divide the budget between appearance and practicality.
A full body kit without the right wheels and stance is directly called a bad spend here. In that case, the car may end up looking simply overloaded with plastic, but not like an X6M.
Strong lowering and large spacers without precise measurements can create rubbing, extra load on the suspension, and odd wheel geometry in the arch. In other words, an attempt to “strengthen” the image can quickly turn into technical problems.
22-inch wheels give better proportions, but make the car stiffer and more sensitive to road surface. For everyday use, this is not always a convenient option.
Some of the modifications most associated with the X6M look are pushed to a later stage, so there will be no quick “ready” result. If you want to change the appearance right away, you will either have to wait or spend more on a comprehensive package.