Replacing or installing a new car stereo — one of the most popular tuning upgrades for a car. Modern models with Android, Bluetooth, Apple CarPlay, and Android Auto make trips more comfortable, and the installation is manageable for almost any driver. The key is — follow the sequence and don’t mix up the wires. In 1–2 hours you’ll get quality sound without a trip to the service station.
What you’ll need for installation
- A new head unit (1DIN or 2DIN) with a trim panel/adapter frame for your car.
- Screwdrivers (Phillips and flathead), plastic pry tools (so you don’t scratch the dash).
- Electrical tape, heat shrink, or terminals.
- An ISO adapter (if the head unit doesn’t have the factory connector).
- An adapter frame or mounting kit (often required for 2DIN).
- Optional: a multimeter to check voltage.
Step-by-step installation instructions
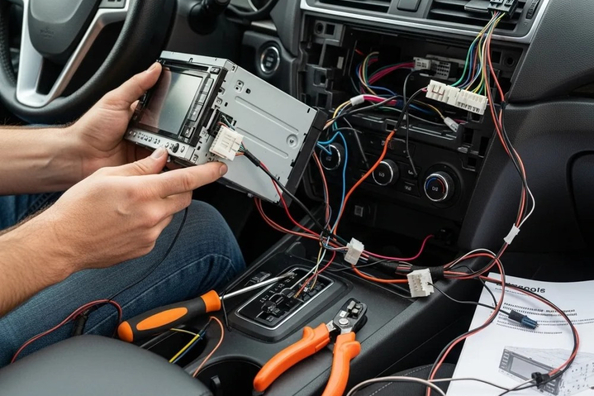
- Preparation and removal of the old stereo: Disconnect the negative («–») battery terminal (to avoid shorts, wait 5–10 minutes). Remove the decorative trim around the factory stereo (use a pry tool and release the clips). Unscrew bolts or unclip fasteners, pull the stereo out. Disconnect the antenna, USB, and the power and speaker connectors.
- Wiring connection: Typically, the standard ISO wiring scheme is used:
- Yellow (BAT) — constant +12 V (from the battery).
- Red (ACC) — +12 V with ignition on.
- Black (GND) — ground (negative).
- Blue/blue-white (REM) — for an amplifier or antenna.
- Speakers: white/gray/green/purple + and – (front/rear, left/right). Before connecting, check voltage with a multimeter — in some cars the yellow and red wires may be swapped.
- Connect by soldering/twisting or with crimp terminals (or use an ISO adapter with no changes to the factory wiring). Check speaker polarity — otherwise the sound will be «flat».
- Installing the new stereo: Insert the adapter frame into the dash (if needed). Connect all plugs, antenna, USB. Slide the unit into the slot and secure it with bolts or clips. Reconnect the battery and check: it powers on, the radio receives stations, and audio plays.
- Final check: Test all functions: Bluetooth, AUX, rear-view camera (if present). If the sound is weak or there’s noise — check the ground and polarity.
Tips for a hassle-free installation
- If your car has a CAN bus (many modern models) — use an adapter for the steering wheel buttons.
- Don’t connect constant +12 V to ACC — the battery will drain quickly.
- For 2DIN, you often need a trim frame and dash trimming (if the vehicle design allows it) — do it carefully.
- If you’re unsure about the wiring — contact an auto electrician to avoid damaging the vehicle’s electrical system.
Installing a stereo yourself — it’s not only a saving, but also the satisfaction of upgrading your car with your own hands.