
Aquaprint technology: secrets that no one will tell

This material was prepared using AI tools for topic research, structuring and initial draft creation. Fact-checking, editing, expert review and final approval were performed by Maksym Vasyliovych Radomskyi.

Akvaprint technology - for the first time on the open spaces of the Runet. Many people read about how the process of decorating surfaces using the aquaprint method (other names - aqua printing, immersion printing) occurs on various sites and watched videos on YouTube. But everything is not as simple as it seems to us and as the masters show in their videos. In addition, no one has yet revealed all the secrets of the technology and we are flattered to be the first. So let’s get started ...

How to properly prepare the surface?

  • Degreasing.

The first thing to do is to wash the parts to be decorated with a solvent. The fact is that many car manufacturers cover the plastic surfaces of the passenger compartment with a special rubberized compound - this is exactly what will have to be completely removed. In other cars, we come across carefully polished "greasy" surfaces - we, accordingly, simply wash them.

  • Sanding.

The next "means" of surface treatment will be sandpaper. The part must be "sanded" for good adhesion to the ground. In this case, any roughness should be made perfectly smooth.

  • Application of a primer.

A special "plastic primer" is sold at any auto shop that specializes in paintwork. If this composition is not applied to the part to be decorated, then subsequently the soil can "rise", nullifying all the work.

  • Primer.

You can use normal automotive primer. This stage of work is described in more detail in the section Do-it-yourself aqua printing: surface preparation .

After complete drying (!!!) of the soil, the part must be sanded again to perfect smoothness.

  • Base color application.

For basic colors we use nitro-based paint (its advantage is fast drying - about 15 minutes). We apply the paint very carefully so that it lies as evenly as possible on the surface. You can read about how to choose a base color in the section Immersion printing: film collection technology . Now we are waiting for complete drying (the surface should not be sticky!) And proceed to the main stage of our work - aqua printing.

Aquaprint technology: step by step instructions

To carry out the work, you will need to prepare:

  • a bathtub of water, a basin or a bucket (if you plan to do this closely and open your own business, we recommend buying aquaprint equipment in installments );
  • thermometer;
  • boiler;
  • timer (alarm clock, stopwatch);
  • air compressor;
  • spray.

Stages of work:

  1. Pour water into a bathtub for aqua printing or homemade and heat it to a temperature of 29-31 ° C.
  2. We cut a pre-prepared piece of film (just do not save so as not to throw it away later!) And make small notches on all sides along the edge every 2 cm.
  3. Now we carefully immerse the aquaprint film on the surface of the water and fix it so that it does not "run away". To determine which side to put the film on the water, you need to moisten the index and thumb, clamp the material with them. The side that sticks, and you need to immerse the film.
  4. At this point, you will watch the edges of the film roll up to the end of the notches. Now we wait exactly 2 minutes. For the first 30 seconds of the indicated time, the emerging air bubbles should be blown out (only without fanaticism). If they are not there, then we do not touch anything.
  5. After 2 minutes, start applying the activator for aqua printing. This should be done in zigzag movements vertically and horizontally. Time again - this time 5-10 seconds.
  6. We proceed to immerse our part in water. This should start from the sharpest angle, and immerse inward - strictly at an angle of 45 degrees.
  7. After complete immersion, the part is immediately removed back and dried in air for several minutes.
  8. Now we need to wash the decorated surface from grease - this can be done in the same water where the film was applied or in clean water, but it is important that its temperature is also within the range of 29-31 degrees.
  9. We dry the part.
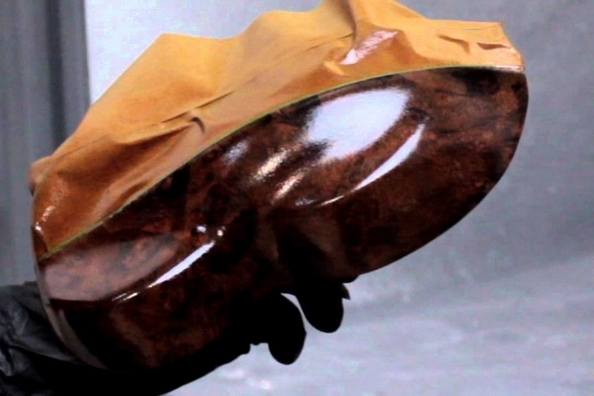
  10. And the last stage is varnishing, polishing from dust particles and streaks. How to apply varnish correctly, we have already written more than once in a series of articles " All about aquapress ". The only recommendation - for a deep shine, the surface should be varnished in 3-5 layers. In addition, for a more interesting effect, you can add metallic or pearl to the composition.

The above aquaprint technology is used by our craftsmen (only on special equipment), who have been successfully decorating any surfaces (and not only automobile ones) in this way for several years. We hope you will succeed!

;

When copying materials from the site, the installation of a direct link to the source of information is required. The copyright protection system automatically monitors data, and transfers all illegal actions to search engines, as a result of which theft loses its meaning.

Shipping to EU

Wholesale and retail

Own warehouse

Login to the site
Кредит
Покупка частинами monobank

Опис продукту

  1. Наявність кредитної картки від Монобанку
  2. Доступний кредитний ліміт за сервісом "Покупка частинами monobank"
  3. Перший платіж буде списаний у день оформлення

Подарунки не надаються при оформленні покупки у кредит під 0,01% або при покупці частинами.

Request a callback
Notify when available