31.03.2026
330
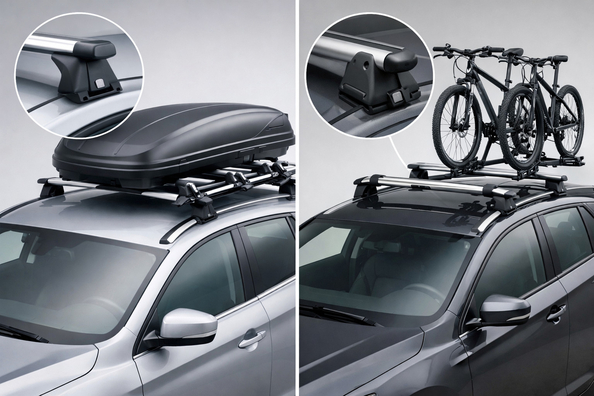

If a car has no roof rails or factory mounting points, the roof rack has to be mounted on a “smooth roof” (most often with a removable clamp-on setup). If factory points/rails/tracks are built into the design, the logical alternative is to mount “in the OEM locations”. In most cases, practicality is determined not by the “strength of the rack as metal”, but by how stably the system holds the load, how to install it without mistakes, and how often you need to check the fasteners.
Below are comparison criteria and clear recommendations on which option is more appropriate for your use cases: from city driving to regular highway trips and occasional travel on bad roads.
The core difference is simple: on a “smooth roof”, universal or removable mounts work by clamping to the roof geometry. With “OEM locations”, the load is transferred to where the vehicle already has dedicated mounting elements/points (rails, tracks, clips, or other manufacturer-provided interfaces). Because of this, installation, the ongoing check routine, and the limits of acceptable use all differ.
In practical terms: a clamp-on option is often faster to install, but more sensitive to correct seating and tightening; OEM mounting points usually provide more predictable retention for regular trips, but installation can take longer and requires accurate positioning and sealing where the design calls for it.
For a real decision, compare not “which rack is more expensive”, but specific usage parameters: installation time and complexity (can you do it yourself without risk), fastener checks (how often and after which conditions you need to re-tighten/inspect), service life/reliability of the mounts considering vibration (frequency and type of trips), everyday practicality (do you need to remove/install it often), noise/aerodynamics (how the system behaves at speed), and turnkey cost (including potential professional installation).
A separate practical block is limitations for off-road use and “bad roads”. Even if a rack can handle the weight in static conditions, manufacturers may specify reduced allowable load or special cautions for use off asphalt.
| Option | Strengths | Weaknesses | Best for |
|---|---|---|---|
| Roof rack on a smooth roof (removable clamp/universal mounting) | Usually faster installation: for removable systems, manufacturers often state about 30–45 minutes; importantly, it’s often realistic to do on your own. Clear rules are provided for checking fasteners after installation and during use. Specific kits come with numeric load limits. | More sensitive to correct seating and tightening; requires repeat checks. For off-road/bad roads, there may be a reduction in allowable load. “Install it and forget it” is riskier here: instructions for similar systems explicitly require checks after some mileage/after rough surfaces. | When there are no OEM points and you need a rack for occasional trips, and you’re ready to follow tightening and inspection instructions; also for scenarios where quick install/removal matters. |
| Roof rack in OEM locations (factory points/rails/tracks) | Usually more predictable retention on regular trips. For many vehicles, OEM points are already designed to transfer load. More convenient if you carry cargo often and want to minimize the risk of “not having time to install it correctly”. | Installation is usually longer: around 60–90 minutes is often cited for factory points and even longer for track systems, often with a recommendation to use a specialist. Care is needed with drainage/sealing in mounting areas. “Wind noise” depends on the specific geometry and accessories, not only on the mounting location. | If you regularly travel long distances with cargo, want fewer risks from “by-eye” installation, and your vehicle has rails/mounting points by design. |
Installation and practicality. For removable systems on a smooth roof, manufacturers often list an installation time of about 30–45 minutes. This makes the option convenient when the rack is installed/removed not daily, but “as needed”. But speed doesn’t replace accuracy: clamp mounts must work exactly as designed by the manufacturer, otherwise the risk of shifting or seating deformation increases.
Fastener checks (real-world durability). Practical instructions usually require disciplined checks: for example, manufacturers of clamp systems emphasize checking after a short drive (after the first installation) and then at intervals, and more often on bad roads. This directly affects “real-world durability”: you’re getting not only hardware, but a safety process.
Load limits and off-road use. Even within the “allowed weight”, manufacturers may introduce reductions for off-road use due to strength margins. For example, instructions for some Rhino-Rack solutions specify a maximum for a specific kit, and for off-road use — a reduction considering the safety factor. In practice: if you actually drive on dirt/rough roads, evaluate not only total weight, but also whether it needs to be reduced.
Noise and aerodynamics. Noise is influenced not only by the mounts, but also by the crossbar shape and whether the system includes elements/accessories to reduce aerodynamic drag. So “smooth roof = it will be loud” isn’t a universal rule, but it’s often more accurate to choose aerodynamic solutions to match your typical speeds.
Installation and correct positioning. On vehicles with factory points/rails/tracks, the logic is to place the mounts in areas intended by the design. But it’s not always “bolt it on and done”: for track systems, professional installation may be recommended, and overall installation time is usually longer than for removable smooth-roof solutions.
Sealing and water around the mounting area. A practical feature of OEM mounts is how they seat and whether any foreign material interferes in the mounting area. For example, technical notices for OEM elements sometimes note that excessive sealant in a very specific gap can prevent a clip from seating tightly, potentially creating a path for water. The point: don’t “flood everything with sealant” — follow the instructions.
Safety and checks. Even OEM solutions require checks; the discipline is just different: manufacturers often provide a schedule — when to re-tighten/inspect after installation and then on a routine basis. On regular trips, this is usually more convenient: fewer chances of “blind” installation errors.
Load boundaries. As with other systems, allowable load is defined by the specific kit and its mounting points. So when choosing “OEM locations”, evaluate not only roof compatibility, but also the exact limit the manufacturer specifies for your configuration (number of bars/type of crossbars/planned cargo).
| Scenario | What to choose | Why |
|---|---|---|
| No rails/points on the roof, rack needed occasionally | Smooth roof (removable clamp-on option) | Faster installation (around 30–45 minutes) and a realistic DIY install. With correct tightening and control checks, you can maintain safe operation. |
| Regular long-distance trips with cargo, want to minimize installation “human factor” | OEM locations | When factory points/rails/tracks exist, the system works within the vehicle’s design logic. Installation takes longer, but usually has fewer risks of incorrect placement, and fastener checks are defined by the schedule. |
| Driving on bad roads or occasional off-road | Preferably OEM locations (if the design allows), or smooth-roof with load-limit considerations | For clamp solutions, manufacturers may require a reduced allowable load specifically for off-road use and more frequent checks. With OEM points, it’s usually easier to maintain predictable retention. |
| Comfort/lower noise at speed matters | Don’t rely only on the mounting type; choose specific aerodynamic solutions | Noise and drag depend on the crossbars, mounting height/fitment, and accessories. Proper selection is often more important than choosing “smooth/OEM”. |
| Scenario | What to choose | Why |
|---|---|---|
| City + short trips, rack installed rarely | Smooth roof | Fast installation and the ability to remove it when not needed. The key is to follow the rules for re-checking after the first kilometers and then per schedule. |
| Weekly trips outdoors/to a cottage with moderate load | OEM locations (if available) | Practical for regular use: factory anchoring reduces the risk of “shifted/under-tightened”. If you drive on rough surfaces, it’s critical not to ignore checks. |
| Highway travel with predictable speeds | OEM locations or smooth roof — but with proper setup and checks | On the highway, the key is stable retention. Different systems specify checks after installation and then ongoing. If everything is done by the book, both can work, but OEM points are often easier to keep “within spec”. |
| Frequent off-road trips/high vibration routes | OEM locations | For clamp systems, manufacturers often build in additional load restrictions for off-road use and require more frequent checks. OEM points usually deliver a more predictable result. |
A more expensive solution makes sense not because “the more expensive, the better”, but because it often reduces the risk of installation errors and simplifies checks. In particular, if you have OEM points/rails and you’re willing to spend more on correct installation, it may be more practical than trying to quickly adapt a universal option to a smooth roof.
It also makes sense when you carry cargo regularly and want less hands-on routine: in that logic, it’s useful to rely on systems with clearly described re-check procedures. If that’s what matters to you — how to organize the right choice for factory mounts — see the article about a roof rack in OEM locations.
Another argument is when you plan long trips and want to manage comfort at speed: sometimes more expensive accessories (for example, aerodynamic solutions to reduce noise) are more practical than “saving” on the base configuration. But the specific benefit is determined by your real-world speeds and the installation geometry.
If your vehicle has no factory points/rails and you need a roof rack occasionally, the more practical choice is often a smooth-roof option: it usually installs faster (around 30–45 minutes) and can be suitable provided you strictly follow tightening and the inspection schedule. For bad roads and off-road use, consider the allowable-load limitations that manufacturers specify for such systems.
If your car does have OEM mounting locations and you regularly carry cargo or travel long distances, installing into OEM points is usually more practical and safer: it takes longer, sometimes requires professional service, but provides more predictable retention in everyday use. The verdict is simple: choose a smooth roof for “when you need it fast” with disciplined checks, and OEM locations for “when you need it stable and regular”.
| ✔ | A roof rack for a smooth roof is usually installed faster: for removable clamp-on systems, manufacturers specify about 30–45 min, which is convenient if it is needed only occasionally. |
| ✔ | There are clear rules for checking the mounts: instructions for clamp-on systems explicitly require checks after installation and at certain mileages, so safety can be maintained through discipline. |
| ✔ | In the “factory mounting points” version, the fixation is often more predictable for regular trips, because the load is transferred to the vehicle’s designed mounting points. |
| ✔ | Factory mounting points make it easier to choose for typical regular transport scenarios: the installation logic is clearer, and the inspection schedule is usually easier to follow. |
| ✘ | Clamp-on solutions for a smooth roof are more sensitive to correct fit and tightening: without precise installation, the risk of shifting or mount deformation increases. |
| ✘ | Checks are required in both cases, but for a smooth roof they are more critical: “install and forget” directly contradicts the instructions, especially after driving on poor roads. |
| ✘ | Installation in factory mounting points is usually longer (often 60–90 min and longer for track systems) and may require service installation if the manufacturer insists on it. |
| ✘ | During installation into factory mounting points, careful sealing is important: too much sealant in a specific gap can interfere with the clip’s snug fit and create a path for water. |
Shipping to EU
Wholesale and retail
Own warehouse
Опис продукту
Подарунки не надаються при оформленні покупки у кредит під 0,01% або при покупці частинами.