24.04.2026
560
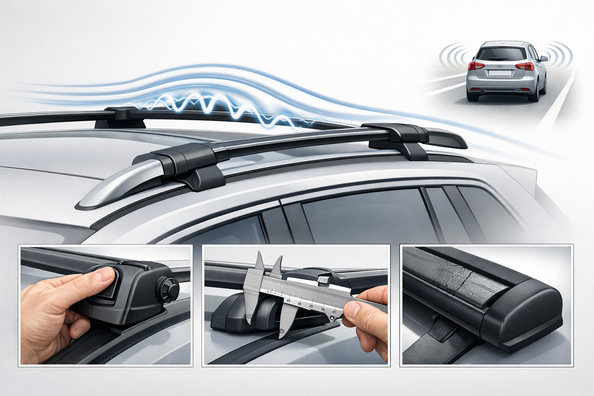
A hum or “wind” noise from a roof rack on standard roof rails most often shows up at around 90 km/h (often already from ~56 km/h) due to aerodynamics: airflow creates turbulence around the crossbars and their gaps, and also resonance if there’s play or the rubber seals/strips are seated incorrectly. In many cases, the problem isn’t the rails themselves, but how the crossbars and rubber clamping elements are installed.
In practice, start by checking fitment and play: re-tighten the fasteners, verify the position of the rubber strip (so it sits flush with or below the bar surface), and adjust the crossbar position. If only short-term “band-aid fixes” help, the root cause almost always remains.
At speed, airflow forces increase, and any “gap” in the design becomes a source of whistling/humming. On roof racks mounted to rails, it’s almost always a combination of two factors: turbulence around the crossbars and their mounts, plus vibrations from play or poor sealing. If the rubber clamping strip is installed incorrectly, air can get under it and start “whistling” or humming within a specific speed range.
A common technical scenario described in bulletins: the rubber “rub strip” can end up sitting higher than the bar, allowing airflow to catch the edge and create noise; the correct fix is then to replace/reposition the strip per the procedure and confirm with a test drive.
Most often, the hum is caused by the following (from more to less likely in typical situations):
Stick to a simple algorithm that separates “aerodynamics” from “play.” First determine whether it’s more of a whistle/hum from airflow or a rattle from moving parts. Then check the node that logically produces noise at your speed.
Key point: if the sound is “tied” to speed and disappears/changes after precise fitment adjustment or repositioning, it’s almost certainly aerodynamics/resonance—not an engine or wheel issue.
| Symptom | Likely cause | What to do |
|---|---|---|
| Hum/“wind” noise starts at a specific speed (often from ~56 km/h and up) and intensifies up to ~90 km/h | Turbulence around the crossbars and their gaps; possible resonance of joints | Check for play, fitment of the feet, correct crossbar position; do a road test after tightening/repositioning |
| Noise noticeably changes when you touch/rock the rack while stationary | Loose fasteners or incorrect seating of adapters/clips | Re-tighten fasteners to the manufacturer’s specification, check that all joints are seated evenly, repeat the “shake test” |
| Whistle/hum feels like airflow “blowing” from the crossbar edge | Rubber clamping strip is above the bar or damaged/slipped | Remove the element and check the level: the strip must be flush with or below the bar surface; replace per procedure if needed |
| Noise appears/gets much worse when a specific accessory is installed (box, bike rack) | The accessory creates additional turbulence and changes airflow | Remove the accessory and check the noise; if it disappears, look for compatibility/correct accessory position or additional airflow management |
To properly select/adjust a roof rack for rails and avoid wasting time guessing, go to the roof rack for rails page—practical installation and compatibility pointers are collected there.
If, after a “temporary fix,” the noise returns at the same speed, it’s an indirect sign the issue is geometry/fitment or play—not just “external” vibrations.
Accessories make sense when you’ve already determined it’s wind noise from airflow, not play. The most rational options are:
If you’re considering “premium” accessories or parts for your existing crossbars, focus on compatibility with your crossbar type and mounts. For example, typical roof rack maintenance recommendations emphasize that correct seating and adjustment matter more than “adding something on top of what’s already there.”
| Solution | When it works | When it’s not worth spending money |
|---|---|---|
| Checking/correcting the fitment of the rubber clamping strip (and replacing it if it won’t seat correctly) | When the whistle/hum feels like airflow “catching” the crossbar edge, or the rubber is clearly skewed/can’t be set | When there’s obvious play that hasn’t been eliminated: in that case, tighten the fasteners first |
| Tightening fasteners and eliminating play | When the sound changes during the “shake test” or appeared after installation/after driving | When the strip/seals are definitely installed correctly and there’s no play—then the issue is more often airflow-related |
| A wind fairing (fairing) on the front crossbar | When it’s wind noise from airflow, stable by speed, and it didn’t disappear after adjustments | When the noise is rattling/knocking from mechanical movement: address play and fitment first |
| Replacing crossbars/switching to a different system | When, after proper installation, seal correction, and eliminating play, the noise remains and you’ve clearly identified an aerodynamic cause | When the cause hasn’t been checked yet: without a basic inspection of strips, fasteners, and geometry it’s a gamble |
If a roof rack on rails starts humming at around 90 km/h, the most common culprits are the crossbars and their seating: play in the mounts and/or an incorrectly installed rubber clamping strip (especially when it sits above the bar). Start with practical checks: the “shake test,” verifying rubber strip level, and tightening per the instructions—then do a control run at the speed where the noise occurs.
Accessories like a wind fairing and replacing rubber elements make sense only if you’ve already eliminated play and confirmed the issue is airflow. If you haven’t, your budget will most likely go toward a temporary effect or a solution aimed at the wrong cause.
Shipping to EU
Wholesale and retail
Own warehouse
Опис продукту
Подарунки не надаються при оформленні покупки у кредит під 0,01% або при покупці частинами.