24.09.2026
273
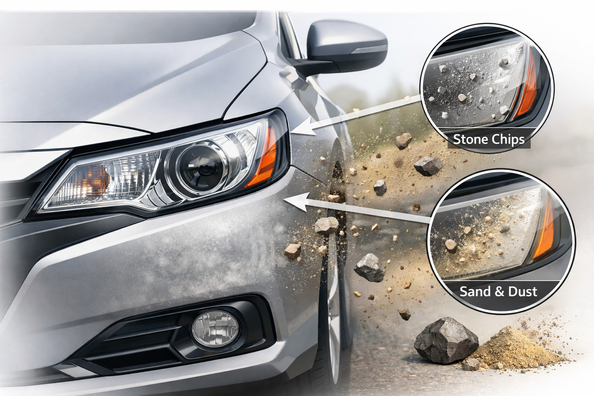

If your headlights turn hazy after just a few highway trips or after winter, it’s usually not just dirt. Most often, sand and small stones knock micro-pits into the outer polycarbonate layer, and the sun finishes off the weakened UV protection. That’s why a regular wash or a quick polish delivers either no result or a very short-lived effect.
The key question is whether the defect is on the outside or inside. When the haze, yellowing, and roughness are on the outer surface, restoration with new UV protection and additional impact protection works. If there’s moisture inside, cracks, or damage to the inner side of the lens, polishing the outside won’t solve the problem.
Most modern headlights are made of polycarbonate. The material itself is lightweight and impact-resistant, but it doesn’t handle long-term abrasion and sunlight well without a hard protective layer. When that layer is beaten up by sand, fine gravel, and road debris, the surface is no longer smooth: pitting appears, light starts to scatter, and the headlight looks cloudy.
How fast the defect shows up depends on driving conditions. On highways, gravel roads, in winter with abrasive road mix, and on cars with low-mounted or more vertical headlights, wear happens faster.
DD Tuning expert comment: The most common mistake is trying to “freshen up” a headlight with compound without understanding whether there’s pitting on the surface and whether the problem is inside the housing. If small pits are already visible under side lighting, simple polishing will only slightly increase gloss but won’t restore a flat surface. The second typical mistake is applying protection to a dirty or not fully restored headlight, which simply preserves the defect under the coating.
| Symptom | Likely cause | What to do |
|---|---|---|
| A matte film after a trip that disappears after washing | Road dust, dirt, insect residue | Wash thoroughly, don’t rub a dry headlight; no restoration needed |
| Rough surface, small pits visible under side lighting | Sandblasting and pitting of the outer layer | Fully restore the outer surface, then add UV protection and preferably additional protection from new impacts |
| Yellowing without heavy chips | Degradation of the UV protective layer | Remove the damaged layer, restore clarity, and apply new protection |
| The headlight quickly turns hazy again after polishing | Last time it was polished without UV protection or the job was incomplete | Redo the restoration properly instead of just going over it with compound again |
| Droplets, fogging, white residue on the inside | Compromised sealing or an internal defect | Look for the cause in the housing, seams, ventilation; exterior polishing won’t help |
| A web of micro-cracks, deep chips, milkiness within the plastic thickness | Severe aging or deep mechanical damage | Consider replacing the headlight or lens, because restoration may deliver a weak result |
What works isn’t a “magic compound,” but the right sequence. If the defect is external, the damaged layer must be removed completely; when part of the surface remains glossy before the process is finished, haze and unevenness often stay visible even after repair.
For a noticeably worn headlight, it usually takes not a single step but an abrasive sequence like P500 → P800 → P3000, followed by new UV protection. If you’re working with a drill, RPM that’s too high overheats the plastic, while RPM that’s too low cuts weakly; the working range is usually around 1200–1600 rpm.
When choosing a protective solution, people often look not only at restoration but also at compatible car accessories. For example, headlight protective covers are appropriate where a tougher barrier against stones is needed, while headlight protective film provides a transparent sacrificial layer without replacing the optics themselves. If the housing already has serious cracks or moisture inside, sometimes it makes more sense to look at front headlights as a replacement rather than endless polishing.
Accessories make sense when the goal is not to treat the consequence, but to stop repeat wear. For highway mileage, gravel roads, and low-mounted headlights, it’s logical to install protection right after restoration—or even on new optics.
An important point: covers, film, or a new coating do not restore an already destroyed surface. Their purpose is to protect a clean, clear, properly prepared headlight.
| Solution | When it works | When it’s not worth spending money |
|---|---|---|
| Thorough washing and degreasing | When there’s only road film and insects on the headlight | When roughness, pits, or yellowing remain after washing |
| Quick compound polishing | Only for very light surface haze | When there is pitting, a destroyed UV layer, or the headlight has already been polished multiple times |
| Full restoration of the outer layer + UV protection | When the defect is external, with no internal moisture and no deep cracks | When the clouding is inside, there’s a network of micro-cracks, or deep chips |
| Film or rigid covers after restoration | When the car often drives on highways, gravel, or in winter on abrasive road mix | When the headlight hasn’t been restored, hasn’t been washed properly, or already has serious defects |
| Sealing repair | When there’s condensation, droplets, or traces of water inside | When the problem is only external sandblasting |
| Headlight replacement | When damage is deep, there are cracks, or restoration is already economically pointless | When the haze is superficial and the headlight can still be restored properly |
From a customer’s experience: the owner of a crossover complained that the headlights became dull almost every season after two winters in a row, even though they had already been polished. Inspection revealed external pitting and the fact that last time there was no proper UV protection after polishing. After full restoration and installation of a protective solution, rapid repeat hazing under the same driving routine was no longer the main issue.
If headlights quickly haze from stones and sand, in most cases the problem is in the outer layer: it has either been beaten by abrasion, or it was left without proper UV protection after a previous repair. A clear sequence works here: diagnosis, full restoration if needed, a new protective layer, and only then accessories.
If the haze is inside, there’s moisture, cracks, or deep damage, it’s better not to burn money on polishing—you need housing repair or replacement. The main advice is simple: don’t treat all cloudy headlights the same; first identify the cause.
Shipping to EU
Wholesale and retail
Own warehouse
Опис продукту
Подарунки не надаються при оформленні покупки у кредит під 0,01% або при покупці частинами.