10.09.2026
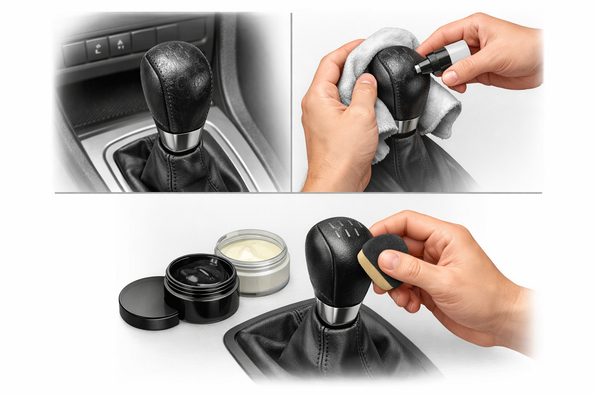
A scuffed gear shift knob often ruins the impression of the interior more than its restoration actually costs. In most cases you don’t need to reupholster the cabin: first you need to tell ordinary dirty shine and a greasy film from real wear of the finish.
The logic is simple: if after a deep clean you’re left with only uneven color or minor scuffs, the part can still be refreshed. If there are already cracks, peeling, or the material crumbles under your fingers, then either a spot repair, a cover, or replacing the knob itself is what works.
The gear shift knob is one of the most heavily used points in the interior. Sweat, skin oils, dust, hand-cream residue, sanitizers, and fine abrasive dirt are constantly mixing on it. At first this just causes shine and tackiness, but over time it starts to wear through the top protective layer.
From there, it depends on the material. On leather or a high-quality finish, the issue can look cosmetic for a long time. On faux leather or an older soft outer layer, the process is faster: heat, sun, frequent city shifting, and the habit of resting your hand on the lever accelerate wear and can bring the part to cracking or the base material crumbling.
Start not with paint and not with a cover, but with a quick diagnosis. It takes a few minutes and immediately shows whether restoration makes sense.
DD Tuning expert comment: the most common mistake is confusing dirty shine with worn paint and immediately looking for reupholstery. The second typical mistake is painting over a greasy or silicone-contaminated surface: it looks fine for the first week, then the layer starts to lift. If after cleaning the knob became more matte but cracks are visible, it’s no longer cleaning—it’s spot restoration or replacement.
| Symptom | Likely cause | What to do |
|---|---|---|
| Even shine, tackiness, darkening without peeling | Greasy film, sweat, dust, residue from hand products | Deep cleaning, degreasing, reassess after drying |
| Some matte finish returns, but minor scuffs are visible | Early wear of the top layer | Spot leveling and touch-up in thin layers |
| Light spots or scratches exactly in grip areas | Coating worn from constant friction | Repair compound in several thin layers, then dye |
| Peeling in patches or cracks around the circumference | The coating is already separating from the base | Repair only makes sense if the base is strong; otherwise a cover or replacement |
| Soft outer layer dents, crumbles, tears | Breakdown of the base itself or old faux leather | Don’t spend on cosmetics; replace the knob or assembly |
| The knob is fine, but only the boot near the base is worn | Wear of the separate shift boot | Replace the boot without touching the knob |
What works best isn’t a single “magic” product, but a sequence of steps. First cleaning and degreasing, then spot leveling, then touch-up dyeing, and only after that protection. This approach makes sense if the material isn’t crumbling yet.
| What to do | When it works | What’s important not to ruin |
|---|---|---|
| Cleaning and degreasing | When there’s residue, grease, and darkening on the surface | Don’t spray product directly on the part and don’t scrub with abrasives |
| Spot repair | When there are minor cracks or scuffs but the base is still strong | Apply several thin layers, not one thick one |
| Touch-up dyeing | When the coating is worn but not flaking off in large pieces | Let each layer dry completely |
| Heat-shrink tubing or a sleeve | When you need a quick cosmetic effect without reupholstery | Consider the knob shape and don’t overheat plastic or inserts |
The key criterion is simple: if after cleaning you see only surface wear, the knob can still be saved. If weak base material is already coming through under the coating, cosmetics will only delay replacement.
In short: anything that masks without preparation gives either a weak result or a nice look for a very short time.
Accessories make sense once you understand the nature of the defect. If the issue is only appearance and the shape and stiffness of the assembly are fine, it’s enough to install a shift boot. If the worn or torn part is the top section, it’s more rational to look at a new shift knob. And when both the knob and the lower boot are tired at the same time, the simplest option is a boot + knob set so you don’t have to match parts separately.
Don’t buy an accessory as a first step if you haven’t tried proper cleaning yet. Quite often a knob that looks “done for” turns out to be simply dirty after cleaning, and the replacement question disappears.
| Solution | When it works | When it’s not worth spending money |
|---|---|---|
| Cleaning and degreasing | There’s shine, tackiness, dark residue, but no peeling | If there are already cracks, tears, and the base is shedding |
| Spot repair and touch-up dyeing | Minor scuffs, shallow scratches, strong base | If the material dents, crumbles, or the layer is lifting in large pieces |
| Cover or sleeve | You need a quick tidy look without deep repair | If the knob shape is complex and the surface under the cover is already falling apart |
| Heat-shrink tubing | You need quick masking, and the design allows removing or properly heating the part | If the knob has decorative inserts, complex geometry, or there’s a risk of heat deformation |
| Full replacement of the knob or the set | The base is damaged, the coating is peeling, repair isn’t cost-effective | If the issue is only surface residue that can still be removed by cleaning |
From a customer’s experience: the person initially planned to reupholster the center part of the cabin because the shift knob looked completely worn out. After proper cleaning, it became clear the boot was still fine, and the problem was the top part of the knob: the coating had worn through in the grip area. In the end they chose replacing the knob without reupholstering the interior, and that was enough to make the cabin look put together again.
A worn-looking shift knob doesn’t mean you need to dive into an expensive full interior re-trim. First, rule out the simplest cause: film, grease, and contamination. If after cleaning you see only surface wear, spot restoration helps; if there are cracks, peeling, or a weak base, it’s more correct to fit a cover or replace the assembly itself.
The main thing is not to confuse cosmetics with real repair and not to paint over dirt. Diagnose first, then choose the simplest solution that truly makes sense in terms of cost and durability.
Shipping to EU
Wholesale and retail
Own warehouse
Опис продукту
Подарунки не надаються при оформленні покупки у кредит під 0,01% або при покупці частинами.