03.05.2026
289
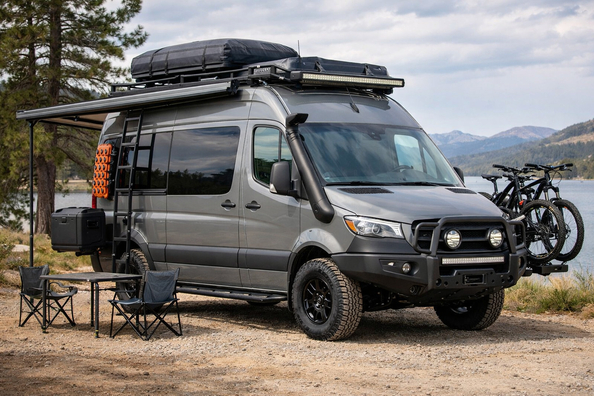
This upgrade plan is for those who are preparing a Mercedes Sprinter W907/W910 for real travel, not for a parking-lot photo. The scenario is simple: sleep properly in the van, avoid stuffy nights, stay warm in the shoulder seasons, not worry about draining the battery, and not overload the roof with unnecessary metal.
The exact parts list depends on the 144 or 170 wheelbase, roof height, and how many people are traveling inside. But the logic is almost always the same: first the microclimate and energy balance, then cabin ergonomics, and only after that everything that adds weight, height, or an “expedition” look.
In a travel Sprinter, the main goal of the upgrade is to make the body suitable for living on the road, not just hauling stuff. If it’s stuffy at night, the walls are wet with condensation in the morning, and during the day there’s no way to charge a fridge and phones, no bars, side steps, or chrome will fix that.
For the W907/W910 it’s especially important not to lose control of weight and roof space. Ventilation, solar panels, an awning, a rack, and a possible roof tent quickly eat up both space and payload margin, so the upgrade has to solve everyday needs in the right order.
The first block is cabin insulation, a thermal curtain between the cab and living area, and proper ventilation. This is the foundation of comfort in both heat and cool weather. If the roof is already planned for other equipment, it’s best to plan ventilation from the start—not after all openings and mounting points are already taken.
The second block is auxiliary heat with correct exhaust routing to the outside. For a touring use case, this matters more than decorative body kit or a complex kitchen. Layout matters: the popular under-seat mounting location doesn’t always play nicely with swivel seats, so the order of work here is critical.
The third block is a separate electrical system: an auxiliary battery, DC-DC charging, and consumption monitoring. The factory upfitter circuits on this generation have current limits, so powering everything from them is a common mistake. If you’re planning a fridge, lighting, gadget charging, and long stops, this is not the place to cut corners.
| Upgrade | Why it’s needed | Who it really benefits |
|---|---|---|
| Insulation, thermal curtain, ventilation | Reduces overheating, heat loss, and condensation | Those who sleep in the van, travel in spring, autumn, or in the mountains |
| Auxiliary heater | Provides stable heat when parked without starting the engine | Those who sleep in the vehicle and travel beyond summer |
| Aux battery, DC-DC, monitor | Runs the fridge, lights, chargers and shows real energy reserve | Those who stay off-grid for more than a few hours |
| Swivel seats and a compact table | Turns the cab into part of the living space | Crews of 2–3 people where every square meter matters |
| Fridge and basic lighting | Improves day-to-day usability without a complex kitchen | Those who travel for 2–7 days and don’t want to depend on cafes |
| Shocks, auxiliary suspension components, tires | Improves handling and comfort under real load | Heavily loaded vans and those who already know their actual weight |
| Roof rack, rails, large roof modules | Creates space for gear or equipment | Only after a weight plan and understanding the roof still has margin |
DD Tuning expert comment: the most common mistake is this—people buy a heavy roof setup first, and only then try to squeeze ventilation, panels, and an awning into the remaining space and weight. The second common mistake is installing a cheap heater and powering travel equipment through the factory lines, even though long stops require a separate, properly calculated electrical system.
Once the basic microclimate and electrics are solved, it’s logical to move on to what truly improves daily living. Swivel front seats and a small table often deliver more value than half the exterior tuning, because the cab starts working as living space rather than dead volume.
This also includes a fridge, proper lighting, and convenient charging points. These are the things you use on every trip. Suspension and tires are best chosen only after the van is assembled at least in a basic form, weighed, and you understand whether it’s driven on highway, dirt, or a mixed route.
Side steps, mats, seat covers, window deflectors, and similar items can be useful, but their effect should be judged realistically. On a tall Sprinter, steps truly make entry easier—especially if passengers get in often or you’re constantly climbing into the cabin with gear. Everything else is more of a small daily improvement, not the foundation of a touring build.
There are also purely visual expenses: chrome, trim covers, massive body kits. For a camper scenario they add little real benefit. If the budget is limited, it’s better to cover heat, ventilation, power, and smart space organization first.
The most common misstep is a heavy roof setup before the total project weight is calculated. For this generation, dynamic roof load is limited, and the static reserve when parked isn’t unlimited either. That means the weight of the rack, panels, mounts, and the cargo itself is counted together. On the long wheelbase, it’s also about the number of supports—not just the desire to “make it strong.”
The second wasted spending area is aggressive tires for a van that spends almost all its time on asphalt. They add noise, often hurt comfort, and don’t solve travel living needs. The third is cheap heaters and random electrical kits without DC-DC and proper consumption control. That’s no longer about saving money—it’s about the risk of doing everything twice.
| Block | What to install first | What can be postponed | What is not required |
|---|---|---|---|
| Microclimate | Insulation, thermal curtain, ventilation | Additional screens, complex solutions for summer camping | Cutting the roof for a pop-top if trips are rare |
| Heat | Auxiliary heater with correct installation | More complex controls and fine zoning | Portable “temporary” heaters of questionable quality |
| Electrical | Aux battery, DC-DC, monitor | Solar panels if stops are short | A large power system for occasional trips |
| Interior | Swivel seats, basic lighting, charging | Table, additional storage modules | A big kitchen from the start |
| Running gear | Check pressure and condition of the factory suspension | New shocks after weighing | An aggressive off-road setup for highway routes |
| Roof and exterior equipment | Only a weight calculation and mounting scheme | Rack, rails, awning after completing the basic work | A roof tent and massive decorative elements without real need |
If you’re building not just a van for a few trips a year but a truly self-sufficient travel vehicle, it’s worth looking at the full selection for Mercedes Sprinter W907/W910 right away and building the project around tasks, not random purchases.
More expensive roof racks and bars make sense when the mass of ventilation, panels, mounts, and the cargo itself is already calculated. For a long wheelbase and high roof, reliable supports and correct load distribution matter more than a nice profile photo.
Quality side steps are also not always justified. They’re needed if the van is tall, often carries people or gear, and you actually use the entry dozens of times a day. If your trip format is occasional, that money is usually better spent on heat, electrics, or a fridge.
From a customer’s experience: at first, the person wanted to start with a roof rack and off-road tires for a “touring look.” After reviewing the use case, it turned out the van mostly drives on highway and the overnights happen in the shoulder seasons, so the priority shifted to insulation, a heater, an auxiliary battery, and swivel seats. As a result, trips became more comfortable already in the first season, and the roof question was moved to the point when the project’s actual weight becomes clear.
For the Mercedes Sprinter W907/W910 in a touring scenario, the right upgrade order is almost always: insulation and ventilation, then auxiliary heat, then a separate electrical system with monitoring, after that cabin ergonomics, and only then roof accessories and the running gear for the real load. This way there’s less chance of overpaying for looks—and a higher chance of getting a van that’s genuinely comfortable to live in on the road.
This material is based on real selection experience, hands-on practice, and real-world use cases, where the best results come not from the loudest accessories, but from a correctly set work priority.
| ✔ | The article clearly lays out the priorities for upgrades: first climate control and electricals, and only then roof accessories and exterior styling. This helps avoid spending budget on things that have little impact on travel comfort. |
| ✔ | There is a practical focus on insulation, a thermal curtain, and ventilation, because these are what solve overheating, heat loss, and condensation. For sleeping in a van, these are basic things without which the camper format works poorly. |
| ✔ | It separately explains why an independent electrical system with an auxiliary battery, DC-DC, and a consumption monitor is needed. This makes it possible to power the fridge, lights, and chargers without the risk of draining the factory system. |
| ✔ | The advice takes into account the layout of the Sprinter W907/W910, including possible conflicts between the heater, swivel seats, and furniture. This reduces the chance of having to redo already installed elements. |
| ✔ | The article includes an honest warning about roof weight and suspension load. This is useful for those planning a long wheelbase, panels, an awning, or a roof rack and who do not want to exceed the permissible load. |
| ✘ | The material gives almost no specific details about brands, models, or approximate budgets. Because of this, after reading it the work sequence is clear, but it is not clear what exactly to buy within each section. |
| ✘ | There are no exact technical parameters for individual solutions, for example the heater output, battery capacity, or solar panel size. For practical planning, this leaves too many decisions to the owner's discretion. |
| ✘ | Some recommendations are presented as general logic, but without tying them to a specific 144 or 170 configuration, roof height, or number of people. Because of this, the article is useful as a priority scheme, but not as a ready-made instruction for one exact setup. |
| ✘ | Certain things are deliberately pushed to the background, for example solar panels or complex camping solutions. For those who want an immediately fully autonomous project, this level of detail may not be enough. |
Shipping to EU
Wholesale and retail
Own warehouse
Опис продукту
Подарунки не надаються при оформленні покупки у кредит під 0,01% або при покупці частинами.