30.08.2026
58
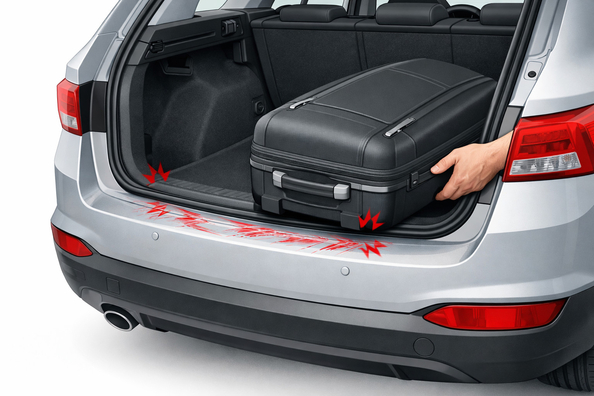

The rear edge of the bumper gets scratched not because the paint is “weak”, but because this is exactly where cargo almost inevitably touches the body. A suitcase, stroller, bike frame, a zipper on a bag, keys in your hand, or sand at the bottom of your things all act like an abrasive at a point where contact happens again and again.
The key here is not just to cover the mark, but to understand the depth of the damage and the cause of the contact. If the scratch is within the clear coat, it can often be removed with polishing and then immediately sealed with protection. If you can see a light layer or your fingernail clearly catches, you already need a localized body repair—not another “magic” sticker.
The most vulnerable spot is the upper edge of the bumper near the trunk sill. This is where people rest cargo when they don’t lift it fully, but slide it slightly inside. On crossovers, wagons, and hatchbacks this happens more often because the sill is wide and items are heavy or awkwardly shaped.
The problem gets worse when there’s sand, small stones, dried dirt, or metal protrusions on the items. Then even a soft bag leaves dull scuffs, while stroller wheels, bike pedals, or hard hardware create deeper scratches.
DD Tuning expert comment: the most common mistake is buying a protector after the first scratch and sticking it onto a cold bumper or one that wasn’t fully degreased. The second typical mistake is polishing a deep mark that has already gone through the clear coat. The right order is: assess the depth, remove surface defects, and only then install protection for your specific loading scenario.
| Symptom | Likely cause | What to do |
|---|---|---|
| Wide dull scuff without deep grooves | Friction from bags or suitcases with dust and sand | Polishing, clean the items, protect the edge or use a fold-down loading mat |
| Individual deeper scratches in one area | Zipper, buckle, pedal, metal part of a stroller or bicycle | Change the loading method, turn hard elements inward, install a rigid protector |
| The mark almost disappears after wetting with water | The scratch is mostly in the clear coat | Try gentle polishing, then cover the area with clear film or a protector |
| Fingernail catches noticeably, a light layer is visible | Damage has gone through the clear coat | Localized touch-up or body repair, then protection |
| New marks appear after trips with a stroller or dog | A repeating contact scenario at one point | Install permanent edge protection or a fold-down protective loading mat |
| The protector starts lifting at the edges | Installed on a cold, dirty, or wet surface | Reinstall correctly: clean surface, warm bumper, no washing immediately after installation |
The solutions that work either eliminate the contact itself or move it from the paint to a consumable protective element. The simplest way is to stop sliding cargo the last few centimeters over the edge and lift it over the sill. It’s basic, but this habit alone prevents half of new marks.
The second practical solution is to keep stroller wheels, the bottoms of bags, and hard parts of equipment clean. If there’s sand on the items, new scuffs will appear even after polishing.
For permanent protection, a rigid edge protector, a fold-down loading mat, or clear polyurethane film work well. Film is nearly invisible and suits those who want to preserve the look. A rigid protector handles rougher contact better. A fold-down mat is convenient if you often load a stroller, tools, or a dog.
If marks keep appearing specifically on the upper edge, it makes sense to install a rear bumper protector. It takes the daily friction from suitcases, strollers, and hardware—so it addresses the cause rather than masking the result.
When you need a harder mechanical barrier on the exposed edge, look at bumper protective trims. If the main issue is dirt and sand that constantly comes in with your stuff, rubber trunk mats are useful: they don’t protect the paint directly, but they reduce the amount of abrasive in the loading area.
Adhesive accessories should be installed only on a clean and warm surface. For trims, a safe range is roughly 15–43 °C, and if it’s colder than 15 °C outside, it’s better to warm the bumper and the tape to at least 27 °C. Clear film is best installed at 16–30 °C, ideally around 21–26 °C. After installing a trim, don’t wash the car for at least 24 hours; after film—about three days.
Replacing or repainting the part makes sense when there are already deep punctures, chips, or old repair work on the edge. In that situation, an accessory is needed only after restoration—otherwise it will just hide the problem for a while.
| Solution | When it works | When it’s not worth spending money |
|---|---|---|
| Polishing | Scratch is within the clear coat, fades when wet, fingernail barely catches | A white or gray layer is visible, there’s a deep groove |
| Localized touch-up or repair | Damage has already gone through the clear coat | When the issue is only dull scuffs without depth |
| Clear polyurethane film | You need discreet protection from light to medium rubbing | If the edge is already badly beaten up or you often hit it with metal parts |
| Rigid edge protector | There’s regular contact from suitcases, strollers, tools, equipment | If you only want a cosmetic effect without proper installation |
| Fold-down mat or temporary protective cover | Frequent loading of dirty items, pets, a stroller | When you need permanent protection without doing anything before each load |
| Cheap universal sticker | At best, as a short test for a few weeks | For long-term daily use, especially in winter or after cold-weather installation |
From a customer’s experience: on a crossover, a dull strip kept appearing after a baby stroller and travel bags. After washing and doing a water test, it became clear that most marks were in the clear coat, so they polished first and then installed edge protection. As a result, new contacts leave marks on the protector rather than the paint, and the owner stopped touching up the same area over and over.
If the rear bumper gets scratched during loading, start with two things: figure out what exactly is catching the edge, and determine the depth of the damage. Surface marks are often solved by polishing and proper protection, while deep ones require repair and only then a trim or film. This material is based on real-world experience selecting protection, installation practice, and real usage scenarios—from suitcases and strollers to sports gear and transporting pets.
Shipping to EU
Wholesale and retail
Own warehouse
Опис продукту
Подарунки не надаються при оформленні покупки у кредит під 0,01% або при покупці частинами.