15.06.2026
327
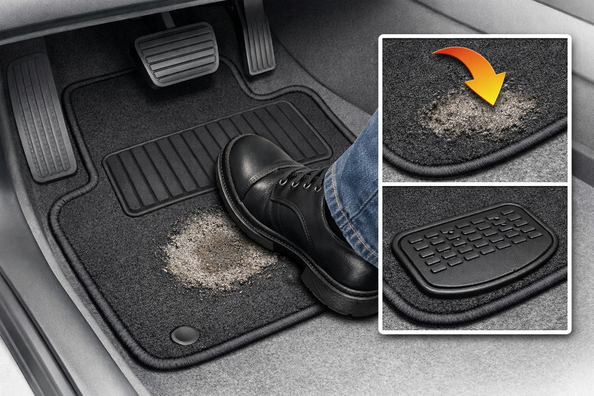
The driver’s floor mat wears through under the heel for a reason: this spot is subjected to constant, localized friction. Your foot barely lifts off the support, the heel pivots while working the pedals, and the material gradually wears faster here than across the rest of the surface.
The issue is accelerated by sand, salt, wet shoes, a stiff sole, and a mat that even slightly creeps forward. You can stop the wear, but first you need to understand what’s causing it in your case: weak material, the wrong shape, poor retention, or already-damaged carpeting under the mat.
In the heel area, the load isn’t just high—it’s repeated in the exact same point. Even if the driver is careful, the foot rotates slightly during acceleration and braking, and the sole acts like an abrasive. For a carpet mat this ends with a smooth bald spot; for thin rubber or soft polymer—thinning and a crack.
If there’s sand and moisture on the surface, friction becomes even more aggressive. In winter, wear is usually noticeably faster because wet grime with salt accumulates under the heel. If the mat isn’t secured, the problem doubles: both the material and the area it shifts over wear out.
DD Tuning expert comment: The most common mistake is looking for a thicker mat without checking whether it’s properly secured and whether the heel working area aligns with the reinforcement. The second typical mistake is sticking a patch onto a dirty or damp surface and then wondering why it peels off. If the mat is already sliding or the factory flooring under it has worn through, you should start not with a patch, but by eliminating that root cause.
| Symptom | Likely cause | What to do |
|---|---|---|
| A smooth bald spot appeared under the heel | Constant friction in one spot, soft top layer | Install a heel pad or switch to a mat with a reinforced zone |
| Wear sharply increased in winter | Sand, salt, moisture under the shoes | Shake out and vacuum more often; don’t leave wet grime for weeks |
| The mat slides forward | Weak or broken retention, mismatched shape | Restore the mounting points or replace with a vehicle-specific mat |
| The edge under the heel curls up | Thin material or incorrect contour | Stop using a thin universal mat and move to a stiffer one |
| There’s a hole in the mat and damage on the floor underneath is already visible | The problem was ignored for too long; wear spread below | Replace the mat and separately assess the condition of the factory flooring; sometimes the base needs repair |
If the mat is still intact but the heel area is already shiny or thinning, it makes sense to install an separate heel pad. It’s cheaper than replacing the whole set and works exactly where the main contact happens.
If the problem keeps repeating with thin or universal solutions, it’s worth switching to EVA cabin mats or rubber cabin mats. The former hold their shape well and trap dirt in the cells; the latter are practical where there’s lots of moisture and winter debris. But no accessory will fix broken retainers or an already compressed base under your feet.
| Solution | When it works | When it’s not worth spending money |
|---|---|---|
| Separate heel pad | When wear is localized and the mat still holds its shape | When the mat is already tearing at the edges or sliding due to weak fasteners |
| New vehicle-specific mat | When the old one doesn’t match the floor shape or constantly creeps forward | When the problem is damaged factory flooring underneath |
| Rubber or stiffer polymer mat | When the car often drives in mud, rain, and snow | When the main cause is uncomfortable stiff footwear and lack of retention |
| Adhesive patch | When the surface is flat, clean, and dry, and the mat doesn’t have heavy texture | When the spot is already torn, wavy, or constantly wet |
| More frequent cleaning and checking the fasteners | Almost always as basic prevention | Won’t help as the only solution if the material is already worn through to a hole |
From a customer’s experience: at first the person wanted to simply cover the hole with a cheap patch, but during inspection it turned out the old universal mat was also sliding forward. In the end, they installed a vehicle-specific mat and a separate heel pad at the correct support point. After that, the wear stopped progressing, and cleaning the interior became easier because dirt no longer smeared under the heel.
The mat wears through under the heel due to a combination of three factors: point friction, abrasive dirt, and an unsuccessful design or retention of the mat itself. If you quickly check the fasteners, shape, sole condition, and whether there’s wear under the mat, the cause becomes clear without guesswork.
In most cases, what truly works isn’t one magic remedy but a combination: a proper vehicle-specific mat, protection for the heel area, and regular cleaning. If not only the mat but also the flooring underneath is already damaged, you need to repair the consequence—not just mask it from above. This material is based on real selection experience, hands-on practice, and real-world usage scenarios, not untested theory in daily operation.
| ✔ | The problem is explained clearly: the mat wears through under the heel because of constant localized friction, not because of “poor quality” overall. This helps explain why the wear appears in just one spot. |
| ✔ | There is a practical list of causes that can actually be checked on your own: fasteners, the shape of the mat, the condition of the sole, and the presence of sand or moisture. This makes it possible to quickly narrow down the source of the problem without unnecessary assumptions. |
| ✔ | The author offers not one, but several workable solutions: a heel pad, a model-specific mat, a stiffer material, regular cleaning. This is convenient because you can choose a solution for a specific case. |
| ✔ | There is a clear warning about when replacing the mat will not help: if the factory covering is already damaged or the fasteners are broken. This saves time and money because it does not replace the cause with a cosmetic fix. |
| ✔ | The material clearly separates what works and what does not: for example, a second mat on top or a cheap overlay without surface preparation. This makes it easier to avoid solutions that only postpone the problem. |
| ✘ | The article does not give exact criteria for choosing a specific heel pad or mat, only general recommendations. Because of this, after reading it you still have to choose the model on your own. |
| ✘ | There is no step-by-step repair guide if the factory covering under the mat has already worn through. All that remains is a general recommendation to assess the condition of the base and, possibly, make the repair separately. |
| ✘ | Some solutions depend on the condition of the fasteners and the shape of the car, but it is not explained exactly how to check compatibility in difficult cases. This may make choosing harder for those whose mat shifts in a non-obvious way. |
Shipping to EU
Wholesale and retail
Own warehouse
Опис продукту
Подарунки не надаються при оформленні покупки у кредит під 0,01% або при покупці частинами.