22.06.2026
354
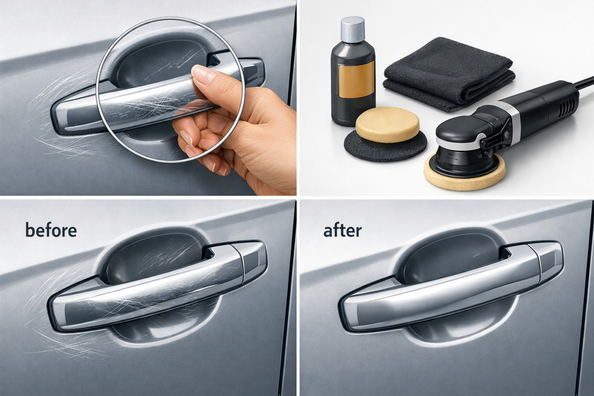

Scratches around the door handle appear quickly not because there’s “something wrong” with the car, but because this is one of the highest-contact areas of the body. Nails, rings, keys, a sleeve cuff, dirt and road salt constantly rub the clear coat in that small recess, so marks build up here earlier than on the rest of the door. Light scuffs can still be removed, but deep ones that catch a fingernail can’t be hidden with polishing.
A sensible workflow looks like this: first wash the area and confirm it’s really a scratch, then assess the depth, and only after that decide whether to polish, do a local repair, or simply cover the spot with protection.
The area under the handle works like a trap for contact and abrasive particles. When you pull the handle, your fingers slide right across the handle cup, and fine dust, sand, and winter road salt add friction. Because of this, even careful use over time leaves a spiderweb of micro-scratches or a few distinct grooves.
The issue shows up more on cars with a deep recess under the handle, dark paint, and a softer top layer of the coating. In winter the marks often look worse because gloves and grime act like a fine abrasive, and in spring after a wash it can seem like the handles “suddenly” wore out.
DD Tuning expert comment: the most common mistake is to immediately rub the handle cup with an aggressive compound without figuring out whether it’s actually the clear coat or just transferred paint or old film. The second typical mistake is to polish the defect and leave it unprotected—then the same scratches return within a few weeks. In this area it’s better to start with the gentlest method and evaluate the result after each step.
| Symptom | Likely cause | What to do |
|---|---|---|
| Fine spiderwebbing, nail doesn’t catch | Surface marks in the clear coat from nails or dirt | Gentle cleaning, hand polish with a finishing compound, then protect with film |
| A single deeper scratch, nail catches | Point impact from a ring, key, or another hard object | Don’t sand aggressively by hand; consider local restoration or touch-up |
| Gray or colored mark on top | Transferred paint or deposits | Try gentle cleaning first and only then polishing |
| Matte spot after previous treatment | Compound too abrasive or too much pressure | Stop—don’t remove more clear coat; if needed, correct with a finishing polish |
| Scratches come back very quickly | The area was left unprotected and contact is constant | After correction, install clear protection or model-specific handle-cup guards |
| Not the recess but the handle itself is damaged | Wear of the handle’s finish or an old trim cover | Look into handle covers or replacing the handle itself |
If the defect is surface-level, the best approach is a simple sequence: cleaning, gentle hand polishing, then protection. In the handle cup it’s convenient to work with a microfiber cloth or a soft foam applicator—without heavy pressure and without trying to “force” the result in one pass.
If the scratches are only in the clear coat, a mild compound often noticeably reduces their visibility without repainting. If after polishing the area looks cleaner but the marks don’t disappear completely, that’s a normal sign that part of the defect is deeper and pressing harder is risky.
For prevention, clear paint protection film works best. In these areas, protection about 0.15–0.30 mm thick is commonly used: it’s nearly invisible, takes minor scratches on itself, and some films can partially “heal” light marks with heat. Apply it on a clean surface and at a normal temperature—roughly in the 16–30 °C range.
Trying to mask a deep groove with a quick spray polish is a waste of time. It may make the mark less noticeable for a few days, but the defect doesn’t go away.
It’s also a bad idea to rub the handle cup with a heavy-cut abrasive compound or a pad under high pressure—especially if a fingernail already catches on the scratch. In this area it’s easy to remove too much clear coat and make a local repair more expensive.
Likewise, you shouldn’t polish an already installed protective film with abrasives. If the protection itself is damaged, it’s usually easier to replace it than to try to save it with aggressive polishing.
Accessories make sense when you clearly understand what exactly you want to cover. If the outer handle itself is scuffed or scratched, it’s logical to look at handle covers: they cover the visible part of the handle and can quickly refresh the look.
If the finish is already peeling, there are cracks, the chrome is worn, or the part itself is loose, cosmetics won’t help—then it’s worth looking at door handles as a replacement. It costs more, but it’s more honest than endlessly masking a worn component.
If the clear coat in the handle cup can still be saved, or you want not to hide but to prevent new marks, the smartest option is clear protection. To understand when this approach is justified, it helps to read the piece on protective PPF. One important nuance: handle covers don’t cover the recess under the handle, so don’t expect them to work where the scratched area is the door paint itself.
| Solution | When it works | When it’s not worth spending money |
|---|---|---|
| Gentle hand polishing | Light marks, haze, surface scratches that don’t catch a fingernail | Deep grooves, chips, the base layer or metal is visible |
| Local restoration by a professional | There are 1–2 pronounced scratches in a visible area, and a neat look matters | If the damage is minor, and after repair you still won’t install protection |
| Clear protective film | After polishing or on an intact surface for prevention | If you apply it over dirt, in the cold, or on already peeling clear coat |
| Handle covers | When the handle itself is worn and you need to quickly cover its outer surface | When the scratches are under the handle, not on it |
| Replacing the handle or a decorative element | The finish is worn through, cracked, or the part has mechanical wear | If the issue is only surface marks in the door’s clear coat |
From a customer’s experience: a typical story goes like this—someone looked for covers because they thought they would hide all marks around the handle. After inspection it turned out the handle itself was fine, and it was the clear coat in the handle cup that was scratched. In the end, light scuffs were removed with a gentle correction, then covered with clear protection on top, and repeated marks stopped building up so quickly.
Quick scratches around door handles are almost always the result of constant contact, abrasive particles, and a small working area. Surface marks can realistically be reduced with gentle polishing, but if a scratch catches your fingernail, it’s better not to “force it out” aggressively—solve it locally or cover it with protection.
The most practical approach is this: correctly determine the depth, don’t confuse damaged clear coat with a worn handle, and after any correction apply protection—otherwise the problem will return. This material is based on real selection experience, hands-on practice, and real-life usage scenarios, not on theoretical advice detached from how a door handle is used every day.
Shipping to EU
Wholesale and retail
Own warehouse
Опис продукту
Подарунки не надаються при оформленні покупки у кредит під 0,01% або при покупці частинами.