Winter cover for Skoda Octavia A4 Tour, A5, A7 and Superb: pick the right generation

Winter grille cover for Skoda is a simple part, but it is easy to get it wrong: on Octavia Tour, A5, A7 and Superb, each generation—and often each facelift—has its own grille shape. A cover from a neighboring model year will either fit with gaps or will not fit at all. Let’s break down how to identify your version, which covers are available for each model, and how to install them correctly.
Contents
- In brief
- How to identify the generation and facelift
- Octavia Tour (A4): upper and lower grille
- Octavia A5: before and after the facelift
- Octavia A7: single-piece or split headlights
- Superb: three generations—different grilles
- Selection table
- How the cover is mounted
- When to install, when to remove, and what to consider
In brief
- You choose the cover by the grille, not by the model name: within one generation of Octavia A5, A7 and Superb, the grilles are different before and after the facelift.
- Upper and lower are separate products. The upper one covers the grille near the badge; the lower one covers the opening in the bumper under the license plate. You can install one or both.
- Matte or gloss is an appearance choice where both options are available on the product page; the upper covers for Octavia Tour and Octavia A5, and the Octavia A7 2013–2017 cover are matte only (ABS plastic). Color is black.
- Transition years (Octavia A5 2009–2010, A7 2017, Superb 2013) should be verified by the headlights and grille, not by the year in the registration documents.
How to identify the generation and facelift
The production year can hint at the generation, but at the facelift boundary it guarantees nothing: cars were sold and registered with delays, and some vehicles were imported from abroad. It is more reliable to look at the front end.
- Octavia II (A5). The updated version was unveiled at the 2008 Paris Motor Show, and went on sale in 2009. Pre-facelift headlights are more rectangular; facelift headlights are more elongated and rounded, and the grille around the badge is styled differently as well.
- Octavia III (A7). The facelift was introduced in early 2017; the key sign is the split headlights (the “four-eyed” Octavia). Single-piece headlights mean pre-facelift.
- Superb. The first generation was updated in 2006, the second in 2013, and the third in 2019. In each case the grille changed, so a cover “for the generation” does not fit all years within it.
The simplest check is to compare your front end with the photos on the product page. If you are unsure, send a photo of the front end to the manager: by the headlights and grille the correct version is identified faster than by documents.
Octavia Tour (A4): upper and lower grille
The first-generation Octavia (Tour, A4) is the most popular model in searches for “Skoda Octavia Tour radiator grille”. There are two covers for it:
- upper winter grille for Octavia Tour — for cars from 1996–2010, matte, ABS plastic;
- lower winter grille — the product page states 2000–2010, meaning it is designed for the updated Tour bumper. Owners of earlier cars should compare the shape of the bumper opening with the product photo.
If the bumper has been replaced, go by the actual part, not the car’s year.
Octavia A5: before and after the facelift
For the second Octavia, the catalog has two separate branches, and the covers are not interchangeable: the facelift has a different grille shape, so a “foreign” cover will leave gaps.
- Pre-facelift (in the catalog — Octavia II A5 2006–2010):upper grille cover for Octavia A5 and lower bumper cover.
- Facelift (Octavia II A5 2010–2013):upper grille cover for Octavia A5 after the facelift and a separate lower cover.
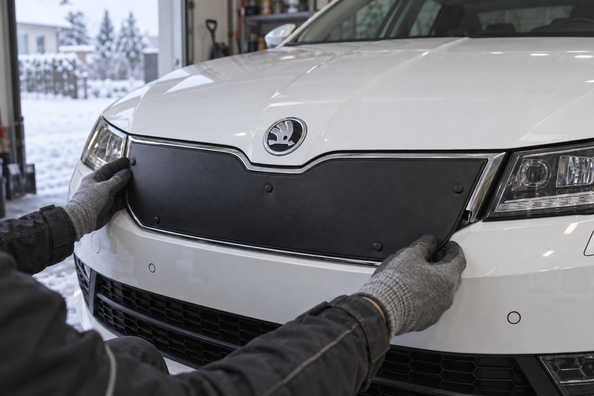
All four are black, with hooks and a mounting kit; the upper ones are matte only and made of ABS plastic, the lower ones are matte or gloss. The upper one has a cutout for the badge, so the emblem stays in place. For cars from 2009–2010 we recommend not relying on the year: a facelift car, even a 2009 one, needs a cover from the “2010–2013” branch; a pre-facelift car needs one from the “2006–2010” branch.
Octavia A7: single-piece or split headlights
The third Octavia has two different covers for the main grille above the license plate:
- winter grille cover for Octavia A7 2013–2017 — for cars with single-piece headlights, ABS plastic;
- winter grille for Octavia A7 after the 2017–2020 facelift — for cars with split headlights, polystyrene.
There is no separate lower bumper cover for the A7 in the catalog—only the main grille is covered. For 2017 cars, be sure to look at the headlights: both versions were on sale that year.
Superb: three generations—different grilles
- Superb I (in the catalog 2001–2009):winter grille cover for Superb 2001–2006 — only for pre-facelift cars. This cover is not designed for Superb I after the 2006 update.
- Superb II (2009–2015):upper cover for Superb 2008–2013; for the 2013–2015 facelift there is a separate upper cover made of polystyrene.
- Superb III (2015–2024):upper cover for Superb 2015–2019 and the lower cover for the same period. There is no cover in the catalog for cars after the 2019 facelift.
All brand models in one place — in the Skoda winter covers section; covers for other brands — in the winter radiator grille covers category.
Selection table
| Model and years | How to identify | Which cover |
|---|---|---|
| Octavia Tour (A4) 1996–2010 | first generation | upper; lower — for 2000–2010 |
| Octavia A5, pre-facelift (2006–2010 in the catalog) | more rectangular headlights | upper and lower from the “2006–2010” branch |
| Octavia A5, facelift (2010–2013 in the catalog) | elongated, rounded headlights | upper and lower from the “2010–2013” branch |
| Octavia A7 2013–2017 | single-piece headlights | grille cover 2013–2017 |
| Octavia A7 2017–2020 | split headlights | winter grille 2017–2020 |
| Superb I 2001–2006 | pre-facelift first generation | cover 2001–2006 |
| Superb II 2008–2013 | pre-facelift second generation | upper 2008–2013 |
| Superb II 2013–2015 | facelift of the second generation | upper 2013–2015 |
| Superb III 2015–2019 | before the 2019 facelift | upper and lower 2015–2019 |
How the cover is mounted
On the product pages for these covers, the installation type is hooks; mounting elements are included. The cover is installed over the factory grille: the hooks are slipped behind the grille slats and the cover is secured with the fasteners from the kit. The step-by-step procedure is further down the page. Reviews on the site say the installation takes a few minutes, but sometimes the hook needs to be slightly bent to fit so that the cover sits evenly.
The upper and lower covers can be installed and removed independently of each other. General tips on how and with what to cover the grille are collected in the article what to cover the car radiator grille with.
When to install, when to remove, and what to consider
- Season. Install the cover when stable cold weather arrives and remove it when the hard frost is over. In mild weather you can leave only the upper one; in severe frost install both.
- Engine temperature. After installation, watch the temperature gauge, especially in traffic jams and on long climbs. If the needle goes above the usual—remove the lower cover or both.
- Radar and camera. If the car has adaptive cruise control, an automatic emergency braking system with a front radar, or a front camera, find out where the sensor is located. An opaque cover in front of the radar can interfere with its operation, and compatibility with such systems is not claimed for these covers.
- Parking sensors. The upper cover sits in the grille and does not touch the bumper. The lower one goes into the bumper opening—check whether there is a sensor in that opening.
- Washing. Rinse off salt from both the cover and the grille underneath: dirt accumulates in the gaps near the fasteners.
We deliver via Nova Poshta throughout Ukraine; orders from 15,000 ₴ — free delivery by our own transport.
How it works
- Identify your version
- Match the generation and facelift by the headlights and grille, and compare the front end of the car with the photo on the product card.
- Prepare the grille
- Wash and dry the grille and the frame around it, removing salt and dirt from the slats.
- Test-fit the trim
- Place the trim against the grille: the cutout should align with the emblem, and the edges should sit evenly on the frame.
- Secure with hooks
- Insert the hooks from the installation kit behind the slats of the factory grille and secure the trim with the fastener from the kit. If a hook does not sit properly, gently bend it into place.
- Check the result
- Make sure the trim does not wobble and does not cover the sensors, and during the first drives monitor the engine temperature.