27.09.2026
82
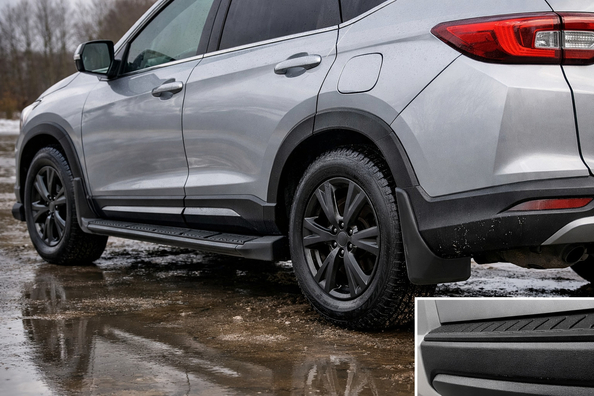
This upgrade plan is for those who drive every day in rain, slushy snow, and off-season grime and want to keep the sills, doors, rear quarters, and bumpers cleaner. If the goal is practical rather than show-oriented, you should start not with expensive coatings, but with things that actually reduce the spray of water and dirt from the wheels.
It’s important to understand the limits right away: no upgrade will keep a car clean forever. On the highway, fine water aerosol will still settle on the body, and on cars with lowered suspension, wider tires, spacers, or changed wheel offset, even proper mud flaps work worse than on a stock setup.
The main task here isn’t “protect the shine,” but to catch the dirt right near the wheel. The most affected areas are the lower part of the doors, the sills, the area behind the front wheels, the rear quarters, and the lower part of the bumpers. That’s exactly where heavy water, sand, road salt, and wet film get thrown.
A proper upgrade should do three things: reduce spray from the tire, avoid collecting extra dirt inside the wheel well itself, and not create new clearance problems. For a sedan, hatchback, wagon, and crossover the priority is the same, but the length and shape of the parts should be chosen for the body and the vehicle’s ride height.
Step one is vehicle-specific mud flaps matched to the factory wheel-arch geometry. They deliver the most noticeable day-to-day effect: less grime on the sides of the body, less wet dirt on the sills, less sand in the area behind the wheel. If there’s a kit that uses factory mounting points without drilling, that’s the better option: less risk to paint and metal.
You should look not for “the cheapest,” but for what actually blocks the throw path from your wheel. If the tires are wider than stock, the wheel sticks out, or you’re running spacers, a small OEM splash guard may give a weak result. On lowered cars, it’s important to check right away whether the mud flap will catch on speed bumps, curbs, and driveway exits. Also keep in mind that on some trims the small OEM guards and full-size mud flaps may not be compatible with each other.
| Upgrade | Why it’s needed | Who truly benefits |
|---|---|---|
| Vehicle-specific mud flaps | Cut off part of the water, slush, and sand right as it leaves the wheel | Almost anyone who drives daily in the city and on the highway during the wet season |
| Fender liners | Protect the inner wheel well, adjacent body panels, and components from spray and debris | Those who drive through mud, snow, road salt, or have damaged/incomplete OEM liners |
| Paint protection film (PPF) on impact zones | Takes the hit from fine abrasion, tar, and marks from sand and small stones | New cars, dark paint, frequent highway driving, and anyone wanting to protect the lower doors and edges |
| Hydrophobic body coating | Makes washing easier and reduces how strongly dirt sticks to the surface | Those who have already done the basic physical protection and want easier maintenance |
DD Tuning expert comment: the most common mistake is buying long universal flaps because they’re cheaper or “look more serious.” On passenger cars they often rub on the asphalt, and with non-stock wheels the result can be worse than with a shorter but properly vehicle-specific kit. The second typical mistake is starting with ceramic when the dirt source from the wheel hasn’t been blocked at all.
The logical second stage is fender liners or replacing damaged OEM ones. They’re not very visible from the outside, but they reduce the contact of water, snow, and dirt with the inner cavities of the wheel well and the parts behind the wheel. For a car that constantly sees winter road salt, this isn’t cosmetic—it’s proper prevention.
If the car is new, freshly painted, or often driven on the highway, after mud flaps and liners you can consider paint protection film on impact zones: the lower doors, the edge of the rear arch, the front bumper, the hood edge. But this is specifically stage two, because film doesn’t reduce the slush spray itself.
A hydrophobic coating, wax, or ceramic works more for easier washing than for reducing how much dirt gets thrown. Water sheets off faster, wet film sticks less, and a dark body looks tidy longer after a trip. But they don’t change the wheel physics.
This also includes solutions that mainly affect the visual impression: very bulky flaps, decorative trims, or elements that make the car look “more off-road,” but don’t block the real spray trajectory. If the goal is to wash the sides of the body less, these purchases often disappoint.
Most often, universal “fits-all” mud flaps are a wasted purchase. They’re either short and sit in the wrong place, or too long and start scraping on speed bumps. This is especially true for low cars and vehicles with modified suspension.
The second mistake is investing right away in an expensive body coating when the car has no mud flaps and has damaged fender liners. In that configuration, the body keeps taking the same stream of dirt—you can just wash it off a bit easier. The third mistake is overpaying for looks when the wheel sticks out past the arch and the chosen part doesn’t cover that extra width.
| Scenario | What to install first | What you can postpone | What isn’t required |
|---|---|---|---|
| Stock city car | Vehicle-specific mud flaps | Fender liners, if the OEM ones are intact and in place | Expensive body coating, if the only goal is less dirt spray |
| Daily driving in rain, salt, and winter slush | Vehicle-specific mud flaps and checking the condition of the liners | PPF on selected zones | Decorative universal flaps without precise fitment |
| New car or dark paint with frequent highway mileage | Vehicle-specific mud flaps | PPF and hydrophobic protection after the basic stage | Any overly long flaps if they reduce ground clearance |
| Lowered car or non-stock wheels | A short vehicle-specific kit after checking clearance | Film on impact zones | Long universal rubber flaps |
More expensive solutions make sense when the basic physics has already been addressed. If it hasn’t, start with mud flaps. If the arches quickly pack up with wet dirt or the OEM plastic is already damaged, the next step is fender liners. And when the car is new, often driven on the highway, or you want to protect the lower doors and edges from abrasion, then it makes sense to look at paint protection film.
Ceramic or other hydrophobic protection is justified when what annoys you isn’t so much the dirt itself, but how often you have to wash and the water spots on the paint. For a budget scenario, it’s not the first purchase. For an expensive new car, it’s a sensible addition after the wheel has already stopped throwing as much onto the body as before.
From a customer’s experience: a common scenario is someone planning to start with a body coating because the car quickly gets dirty along the sides. After assessment it turns out the car is on stock suspension, but has no mud flaps and one damaged fender liner—so the biggest impact comes from the basic wheel-arch protection kit. Once that’s done, the body won’t become sterile, but the sills and lower doors get noticeably less dirty, and expensive coatings then work as an add-on rather than an attempt to solve the wrong problem.
For rain and slush, the most rational order is: vehicle-specific mud flaps first, then fender liners as needed, then impact-zone stone-chip protection, and only after that hydrophobic coatings for easier care. Anything that doesn’t change the spray trajectory from the wheel shouldn’t be prioritized over the basics. This material is based on real selection experience, hands-on practice, and real-use scenarios—not decorative promises.
| ✔ | Model-specific mud flaps deliver the most noticeable practical effect: less buildup on the sides of the body, sills, and the area behind the wheel. They can also be mounted to factory points without drilling, which reduces the risk to the paint and metal. |
| ✔ | Wheel arch liners really help where the car is regularly driven through mud, snow, and road salts. They protect the inner wheel arch and the components behind the wheel, rather than just improving the appearance. |
| ✔ | Paint protection film is useful for areas that constantly take the hit from sand and fine abrasive particles: the lower parts of the doors, the edges of the wheel arches, and the bumper. It is especially relevant for new or highway-driven cars. |
| ✔ | A hydrophobic coating, wax, or ceramic coating really makes washing easier and reduces the sticking of wet grime. For a well-maintained body, it is a convenient addition after basic wheel arch protection. |
| ✘ | None of the upgrades will remove dirt completely: on the highway, fine water spray still settles on the body. So the effect is there, but it is limited by the physics of wheel movement and water flow. |
| ✘ | On cars with lowered suspension, wide tires, spacers, or non-standard wheel offset, mud flaps work worse. In such a setup, even the correct kit may not cover the dirt spray trajectory. |
| ✘ | Universal long mud flaps often turn out to be a poor choice: they either scrape against the asphalt or sit where they are not needed. Because of this, you can spend money and get a weaker result than from a short model-specific kit. |
| ✘ | Hydrophobic and decorative solutions do not solve the problem of slush spray if the wheel arches and wheels are not covered by basic protection. In that case, the body will simply be easier to wash, but the dirt will keep flying the same way. |
Shipping to EU
Wholesale and retail
Own warehouse
Опис продукту
Подарунки не надаються при оформленні покупки у кредит під 0,01% або при покупці частинами.