27.05.2026
353
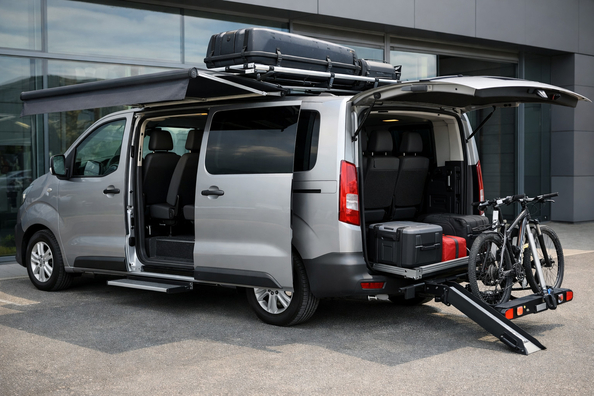

This upgrade plan is for a van owner who, every day, either drops off passengers or hauls boxes, tools, or carts—and doesn’t want to keep jumping over a high threshold, fumbling for a flashlight, or trying to catch the edge of the body with a slippery sole. The main goal here isn’t to make the van “look nicer,” but to eliminate unnecessary movements, reduce the risk of slipping, and cut down fatigue from constant loading.
Since the brand, generation, roof height, and door type aren’t specified, it’s impossible to guarantee 100% compatibility of specific kits in advance. For some vans, the critical point is the side entry through the sliding door; for others, it’s the rear step. And on rough roads, side steps that sit too low also steal ground clearance.
In this scenario, the upgrade should solve three simple things: safe entry, faster loading, and less daily hassle. If the van carries people, it’s important that you can step into the cabin without jumping and without bracing a knee on the seat. If it’s a work van, the key is being able to bring in a box, crate, or tool without jerking your back.
That’s why the right set of upgrades almost always starts not with decor, but with a foothold for your foot, a handhold for your hand, a non-slip surface underfoot, and proper lighting. Only after that does it make sense to think about a ramp, shelves, a partition, or external systems for long cargo.
Top priority: a step at the main traffic point. If people get in through the side door, side access matters more; if the van is often loaded from the rear, start with a rear step. It delivers the biggest daily impact: less step height, fewer knee knocks, and fewer chances to slip in rain or snow.
Second step: a grab handle. When one hand is holding a bag, tools, or a child seat, it takes part of the load off your lower back. But you can’t install just anything: offset depth, the door opening zone, and proper mounting matter—not self-tapping screws “just so it holds.”
Third step: a non-slip floor or inserts in the entry area. It’s not as noticeable as a step, but in real life it works every day: less dirt, less slipping, less damage to the factory flooring.
Fourth step: lighting for the cargo or passenger area. If it’s dark inside the van, people start making extra movements, trip over cargo, or hunt for where to place a foot. Good lighting is often more useful than yet another decorative trim piece.
| Upgrade | Why it’s needed | Who truly benefits |
|---|---|---|
| Rear or side step | Reduces step height, makes getting in and out easier, simplifies access to the body | Passenger vans, couriers, tradespeople, anyone who often loads from the rear |
| Entry grab handle | Provides hand support when your hands are full or the floor is wet | Family and passenger vans, service vehicles, older users |
| Non-slip floor or inserts | Reduces the risk of slipping, keeps dirt and snow under control more easily | Any van used daily |
| Cabin or cargo-area lighting | Eliminates blind spots, speeds up boarding and loading in the dark | Couriers, installers, evening transport, family trips |
| Ramp or load-assist system | Removes the need to manually lift heavy cargo, speeds up work | Those who regularly carry heavy carts, equipment, bulky crates |
| Partition, shelves, bins | Secures cargo, prevents items from flying around, saves time searching | Work vans with tools and small parts |
| Rear-view camera | Makes maneuvering easier in tight yards and near loading docks | Those who often reverse in the city or near warehouses |
DD Tuning expert comment: most often, people buy a universal kit without measuring and without checking exactly where the door, handle, or step ends up after opening. The second common mistake is overpaying for long, massive running boards where what’s really needed is a short foothold near the sliding door or the rear entry. If the van doesn’t drive on asphalt only, always check ground clearance after installation.
Once the basics are covered, the second stage is about choosing what saves time in your exact work pattern. If the van regularly carries heavy loads, then a ramp or load-assist system brings more value than another set of trim pieces. But for occasional boxes, it’s often extra weight, wasted space, and expense with little return.
For a work van, a partition, shelves, and bins are very useful. They don’t look flashy, but they genuinely eliminate chaos in the cargo area, reduce item movement under braking, and cut the time spent searching for tools. If the van is more passenger-focused, instead of shelves it’s more logical to add convenient entry points, lighting, and—if needed—a rear-view camera.
Long side running boards along the full length of the body, decorative trims, chrome on the doors, and similar items can be a nice addition, but they don’t solve the main issue of getting in and loading. If people enter through one specific door, a properly placed step at that point is more useful than a continuous heavy body kit.
It’s also worth mentioning wide side steps “for convenience.” In a flat city environment they can be a reasonable compromise, but on potholes, curbs, and rural roads such a part sometimes starts getting in the way more than it helps. So comfort upgrades should be evaluated against your real route, not photos.
Most often, money is wasted on universal solutions not matched to the body, doors, and floor height. The result: the step is in the wrong place, the grab handle interferes with entry, and the ramp turns out to be too heavy and just lies in the cargo area half the time.
Another typical mistake is choosing decor instead of function. Someone wants to make boarding easier for passengers, but buys long running boards “to look more solid.” Or they want to speed up cargo work, but invest in exterior trim while leaving a slippery floor, a dark cargo area, and no proper point of support.
Separately, be cautious with cheap grab handles and improvised mounts. If the van is used every day, weak mounting quickly becomes not a minor issue, but a risk.
| Scenario | What to install first | What can be postponed | What isn’t required |
|---|---|---|---|
| Daily passenger boarding | Step at the main entry point, grab handle, non-slip entry zone | Additional lighting, camera | Ramp, exterior decor |
| Courier or light cargo | Rear step, non-slip floor, lighting | Shelves, organizers | Heavy ramp, long massive running boards |
| Regular heavy loads | Step, non-slip floor, ramp or load-assist | Camera, shelves | Decorative trims |
| Work van with tools | Step, lighting, partition or basic cargo organization | Roof rails or external cargo rack | Chrome, cosmetic tuning |
A pricier option makes sense when the van truly works every day, not just once a week. In that mode, better anti-corrosion protection, a non-slip working surface, proper hardware, and mounting to factory points are justified. For frequent rear access, it’s logical to look at a rear step rather than a random universal platform.
If the main load goes through the side passage, a more expensive solution may pay off with more precise geometry and convenience for that exact scenario—for example, sliding-door steps when proper passenger entry matters, not a continuous external body kit.
A separate case is long materials—ladders, pipes. Here, an expensive upgrade is justified not by looks, but by work convenience: sometimes it’s more useful to get roof racks than to invest in decorative elements that don’t simplify loading or transport.
From a customer’s experience: often the request starts with “I need something to make it easier to climb in and load.” In real selection, the best result is a simple set: a rear step, a grab handle in the right spot, and a non-slip entry zone—and only then does the person decide whether they really need a ramp. In the end, the satisfaction isn’t that the van looks more impressive, but that daily movements became shorter and calmer.
For the scenario “passenger boarding and loading without daily hassle,” the order is simple: first a step and grab handle, then non-slip flooring and lighting, and after that—a ramp, shelves, a partition, or external systems only if there’s a real need. Most mistakes happen when people buy not for their scenario, but for the picture or “just to have it.” This material is based on real selection experience, practice, and real usage scenarios, so the logic is one: start with what makes movement easier every day, not what’s simply visible from afar.
| ✔ | A step at the main entry point really reduces the step height, making getting in and out easier every day, not just in good weather. For a van with frequent stops, this is the most noticeable practical change. |
| ✔ | A handrail provides extra support when your hands are busy with a bag, tool, or cargo. This is especially useful where a person shifts weight onto their hand rather than simply getting in "on the move". |
| ✔ | An anti-slip floor or entry-area mats reduce the risk of slipping on dirt, snow, or wet shoes. At the same time, they help protect the factory flooring from rapid wear. |
| ✔ | Proper lighting in the cabin or cargo area removes blind spots and reduces unnecessary movement in the dark. This is useful both for passenger trips and for evening loading. |
| ✔ | For a regular work van, a partition, shelves, and trays really reduce chaos in the cargo area and keep items from shifting during braking. It also saves time when looking for tools or small parts. |
| ✘ | Universal kits without measurements and door checks often do not fit as they should. As a result, the step or handrail may end up in the wrong spot, where they do not really help. |
| ✘ | Long bulky sills and decorative body kits do not solve the main task of getting in and loading. On potholes, curbs, and bad roads, they can also reduce ground clearance and start getting in the way. |
| ✘ | A ramp or loading assist system is not useful for everyone: for occasional cargo, it can mean extra weight, occupied space, and additional costs without a noticeable payoff. Such an upgrade only makes sense for regular heavy loads. |
| ✘ | Cheap handrails and homemade mounts are a risk in daily use. If the van is used constantly, weak mounting quickly becomes a safety issue rather than a minor flaw. |
Shipping to EU
Wholesale and retail
Own warehouse
Опис продукту
Подарунки не надаються при оформленні покупки у кредит під 0,01% або при покупці частинами.