10.07.2026
552
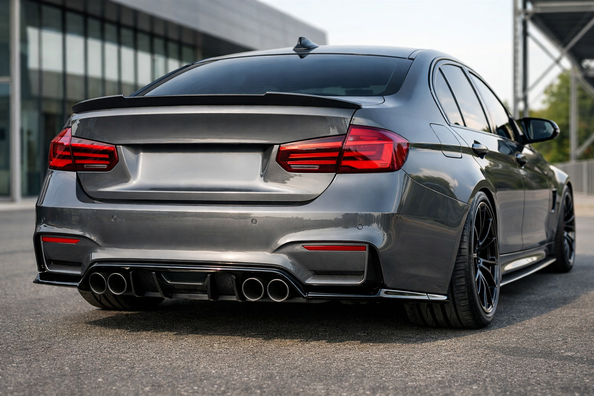

This plan is for a BMW owner who wants to fit a rear diffuser without gaps, misalignment, or exhaust surprises. If the goal isn’t just to “stick on a black insert” but to get a neat lower rear bumper section for a specific body, then compatibility and the order of work matter more than the loud name of the kit.
On a BMW, a diffuser shouldn’t be treated as a universal trim piece. It’s tied to the generation, bumper type, exhaust layout, and sometimes even specific vehicle options. That’s why proper installation starts not with glue or a screwdriver, but with checking the VIN, trim level, and rear-end geometry.
The main job of a BMW diffuser is to properly close off the lower part of the rear bumper, sit evenly in the factory channels and clips, and visually “pull together” the exhaust area. If after installation the edge sticks out near the reflector or the cutouts don’t line up with the tips, the upgrade hasn’t done its job—even if the part itself was expensive.
The second point is not to confuse function with expectations. On a regular road-going BMW, a diffuser most often solves appearance and clean fitment. If you’re building aero logic, then the rear needs to be considered together with the front lip and the overall body kit configuration—not as a standalone decoration.
First priority is to identify which bumper you have: standard or M Sport, pre-facelift or facelift, sedan, wagon, coupe, or another body style. For BMW this is critical: a diffuser for an M Sport bumper usually won’t fit a base bumper, and on certain body styles the shape of the exhaust cutouts can differ too.
Second priority is choosing the exact part designed for your exhaust configuration. If the cutouts don’t match, the problem is almost always incorrect compatibility—not that the part needs to be “forced in.” The least trouble comes from an OEM part or a proven equivalent with accurate geometry.
Third priority is hardware and a test fit. On many BMWs, basic 8 mm and 10 mm tools plus intact factory clips are enough, but old or broken fasteners often cause play and an uneven edge. On some kits—especially for specific platforms like G30/G31—it’s worth separately checking option-related constraints and the installation procedure itself.
| Modification | Why it’s needed | Who it truly benefits |
|---|---|---|
| Match by VIN and bumper type | Eliminates the risk of buying a part for a different body, facelift, or M Sport version | Everyone, without exception—especially if the car wasn’t bought new |
| OEM diffuser or a high-quality equivalent with accurate geometry | Provides an even fit without gaps, warping, or repeated removal | Those who don’t want to trim plastic and live with uneven panel gaps |
| New clips, screws, nuts | Lets you properly secure the part along the entire rail and sides | Owners of cars where the rear bumper has already been taken apart, or where the hardware is tired |
| Exhaust tips matched to the shape of the cutouts | Visually completes the rear end after the diffuser swap | Those whose stock exhaust gets lost in the new cutouts or isn’t centered |
| Front lip spoiler paired with the diffuser | Makes the package logical front and rear when building a cohesive body kit | Those who already have M Sport or are building a consistent aero setup |
DD Tuning expert comment: The most common mistake is buying a diffuser by photo without checking which rear bumper is actually on the car. The second typical story is trying to save the wrong part with glue or self-tapping screws when the issue is geometry or the exhaust cutouts. If the edge won’t sit near the reflector, first check compatibility, channels, and clips—not how hard you can press.
Once the diffuser sits evenly, exhaust tips make sense as the second stage—but only when they’re truly needed for the new cutout shape. This isn’t an upgrade “for the checklist”: it either removes visual emptiness or adds nothing but extra expense.
As a second stage you can also add a front lip or other elements if the car is already in M Sport logic. For some platforms, rear M elements are tied to a specific aero package, so first you need to make sure you have the right base for it. Otherwise you’ll end up in an expensive chain replacement of parts.
A trunk-lid spoiler, mirror caps, decorative carbon, and gloss-black inserts—these are no longer about correct diffuser installation, but about the car’s overall image. They won’t fix the wrong bumper, won’t move the exhaust, and won’t remove a gap at the edge.
If the budget is limited, it’s better to push these back. For a daily driver, it’s far smarter to spend on an accurate part and proper hardware than on decorative details that don’t solve the basic fitment task.
Most often people waste money on universal “finned” diffusers, cheap thin add-on trims with questionable geometry, and carbon decor when compatibility hasn’t been resolved yet. In photos it looks aggressive; on the car it ends with a crooked lower bumper and a constant urge to tear it all apart and redo it.
Another unnecessary expense is buying tips, glue, and extra trims before the bumper itself has been verified. If the cutouts don’t match your exhaust layout, the issue isn’t that you need another layer of tape. On some BMWs, people also get it wrong by ordering an M Sport diffuser for a standard bumper and hoping to “trim something down.”
| What to install first | What can be postponed | What isn’t required |
|---|---|---|
| A diffuser for your body and your bumper | Exhaust tips, if the stock ones don’t get lost in the cutouts | A carbon version instead of the basic one, if the goal is simply a neat fit |
| New clips, screws, and checking the channels | A front lip, if the rear already looks finished | Universal adhesive fins |
| Test fit before final fastening | Trunk-lid spoiler | Replacing the entire bumper if the task is only to fit the correct diffuser |
| Checking exhaust cutouts and compatibility with vehicle options | Decorative clear-coating or painting small elements | Extra glue where the factory uses clips and screws |
A more expensive option makes sense when you want to minimize the risk of trimming and repeated installation. In that scenario it’s logical to start with the BMW rear diffusers category and search not by picture, but by platform, bumper, and exhaust layout.
The second case is when the rear is being assembled as a system rather than a single insert. Then along with the diffuser, muffler tips for BMW 5 Series G30/G31 make sense, and for a balanced front-to-rear package—front lip spoilers for BMW 3 Series G20/G21. There’s no point overpaying just for material if basic geometry and compatibility still aren’t covered.
From a customer’s experience: a G20 owner planned to go straight for a carbon diffuser and large tips, but after checking it turned out the car didn’t have the required aero package and the cutouts didn’t match. First we selected an insert for the factory bumper, replaced the hardware, and did a calm test fit, and moved the tips to the second stage. As a result everything sat evenly—no trimming and no gaps near the reflectors.
Correct diffuser installation on a BMW starts with compatibility, not looks. First the body, bumper, exhaust, and mounting points; then the part itself; and only after that tips, lips, and decorative add-ons.
This order most often saves money and nerves. This material is based on real selection experience, hands-on practice, and real usage scenarios that clearly show the difference between a useful modification and marketing junk.
Shipping to EU
Wholesale and retail
Own warehouse
Опис продукту
Подарунки не надаються при оформленні покупки у кредит під 0,01% або при покупці частинами.