

































































 Author: Radomskyi Maksym Vasyliovych
If water gets into the gap near the glass after installing in-channel window deflectors, the problem is almost never the rain itself—it’s usually the accessory’s fit, or the deflector simply exposed an existing issue with the glass, the seal, or the door drains. Smearing sealant over it is usually pointless: first you need to understand exactly where the water path is forming.
In most cases, what helps is not forcing the glass up harder, but removing the deflector, properly cleaning the channel, reinstalling it in a warm, dry place, and separately checking the glass and seals. Below is a quick guide on how to tell one cause from another and avoid paying twice.
Why this problem happens
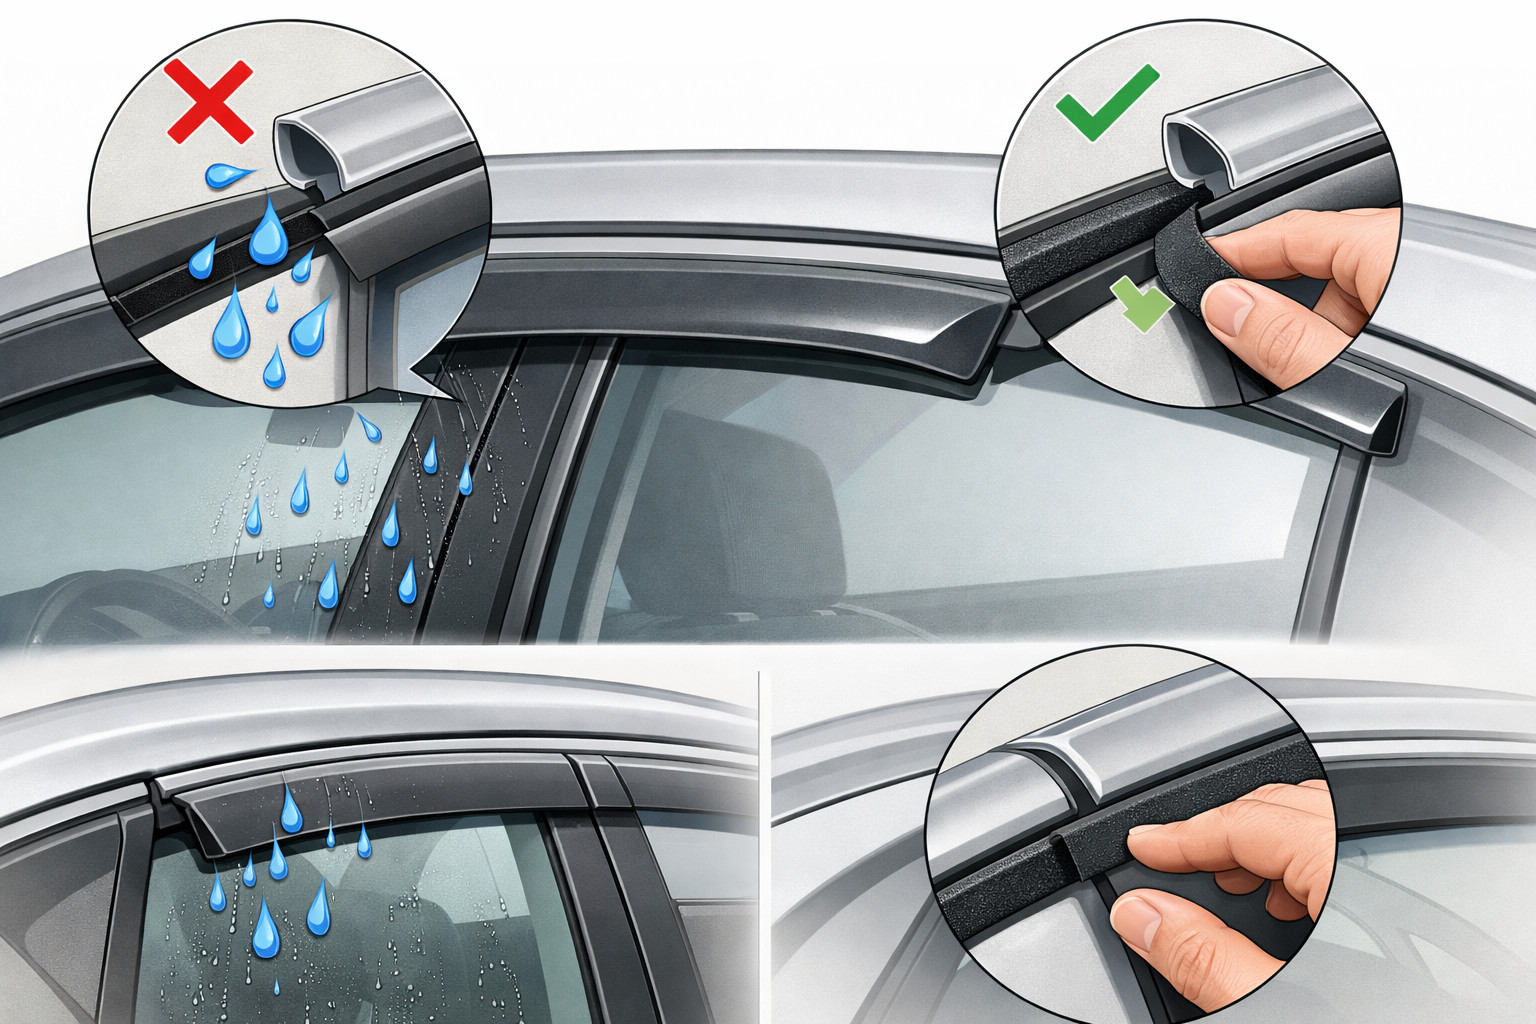
An in-channel deflector does not work as an additional watertight seal. Its job is to redirect airflow and partially shed water when the window is slightly open. If the edge of the accessory sits on the wrong lip, twists the seal, or goes too deep into the channel, a small gap appears—enough for water ingress, whistling, or the window to bounce back.
The second common scenario is that the deflector gets blamed first even though the water source is elsewhere. If the glass is slightly out of square, the upper seal has hardened, or the door drains are clogged, water can get inside even after a careful install. That’s why you need a proper check, not guesswork.
Main causes
- Incorrect seating in the channel. The deflector edge slips under the inner seal instead of resting on the outer lip, leaving a gap.
- Dirt, moisture, or old adhesive in the channel. The deflector won’t seat fully, and the seal twists or pulls away.
- Installing in the cold. On cold plastic and damp rubber the accessory forms worse, and kits with adhesive pads bond more poorly.
- Poor geometry of the kit itself. Cheap or overly thin deflectors can leave a gap in the rear or upper corner even when installed correctly.
- The problem isn’t the deflector. The glass isn’t square, the seal is worn, drain holes are clogged, or water is getting through internal door components.
How to figure out the cause in your case
- Watch when the water appears. If it happens only with the window slightly open, it’s often the deflector profile. If it happens with the window fully closed as well, check the fit, the glass, and the seals.
- Do a water test from top to bottom. Don’t blast a pressure washer into the gap from the side or from below—it’s easy to get a false result. Simulate normal rain.
- Check how the window behaves. If after installation it moves up tightly, bounces back, or won’t fully press in at the top, the deflector is crooked or seated too deep.
- Inspect the upper corner and the seal line. If the rubber is wavy, kinked, or bulging only where the deflector was installed, the cause is almost certainly the install.
- Check the door drains. If water collects at the bottom of the door, you hear sloshing, or moisture appears lower on the door card, look for a blockage and issues beyond the deflector.
DD Tuning expert comment: The most common mistake is trying to force the window up when the deflector is already seated crooked. That doesn’t remove the gap—it only shifts the seal and triggers window bounce-back. If you get whistling after installation or the auto-up starts pushing the glass back down, the first step is to re-seat it properly, not to add glue or silicone.
Symptoms, causes, and what to do (table)
| Symptom | Likely cause | What to do |
|---|---|---|
| Water drips from the upper front or rear corner right after installation | The deflector edge isn’t on its correct lip; the seal is twisted | Remove it, clean the channel, reinstall without bending, check for an even seal line |
| The window won’t reach the top or bounces back | The deflector is seated too deep or shifted | Reinstall the accessory, do 5 slow cycles without auto-up, recalibrate the window regulator if needed |
| Water gets in only when the window is open a few millimeters | The deflector profile is narrow or leaves a triangular gap | Don’t expect watertight sealing from that profile; if needed, switch to a wider or better-fitted kit |
| You hear water in the door; moisture appears below the window line | Clogged drains or an issue inside the door | Clear the drain holes, check the seals and internal door components |
| At speed there’s whistling and fine droplets | A micro-gap due to poor geometry or a shifted deflector corner | Reinstall; if the whistling remains, replace the kit rather than building up tape |
| Leaks occur only after a high-pressure wash | Incorrect test; water is being forced under the seal | Repeat the check with a gentle flow from top to bottom |
What actually helps
The best-case scenario is a full reinstall, not a local patch. Remove the deflector, clean out dirt and adhesive residue, dry the channel, and work in a warm space. For kits with adhesive elements, the rule of thumb is simple: ideally no lower than 10–15 °C, and after installation don’t operate the window for 12 hours up to 24–72 hours if the design requires it.
Before the final install, do a dry test fit. The deflector should follow the frame shape without force, and the seal should not roll into waves. After installation, it’s better to raise the window slowly, without auto mode, and let it travel through its full range a few times so the accessory seats correctly in the channel.
If water remains after that, move from the deflector to the door: check whether the glass presses evenly along the entire upper edge, whether the drain holes are clogged, and whether the rubber seal is visibly damaged. This sequence delivers results more often than random parts replacement.
What almost never works or only helps briefly
- Silicone over the gap. It masks the symptom, but doesn’t fix a crooked fit and often makes later reinstallation harder.
- Extra tape on a dirty surface. It lifts the edge even higher and can make the gap bigger.
- Trying to just close the window harder. This can trigger bounce-back, twist the seal, or overload the mechanism.
- Diagnosing with a high-pressure washer. It doesn’t show a real rain scenario—it forces water in artificially.
When accessories or part replacement makes sense
A new accessory is needed when it’s clear the cause is the kit’s geometry: the edge doesn’t follow the frame, a gap constantly remains in the upper corner, or the rear piece is structurally too short. In that case, it makes sense to look for another set in the window deflectors category rather than wasting time on sealant.
If you’re unsure what to buy, it helps to first understand why vehicle-specific deflectors fit more precisely and in which cases a wider profile covers the edge better. This is especially relevant when the issue shows up not on all doors, but only on one rear window.
Replacing not the accessory but door components makes sense when the glass is misaligned, the rubber seal is already hardened or torn, and the drains haven’t been cleaned in a long time. If everything was dry before installation and the leak started immediately after, the first thing to do is redo the installation.
Solutions: when it works and when it’s not worth spending money (table)
| Solution | When it works | When it’s not worth spending money |
|---|---|---|
| Full reinstall in a warm, dry place | There’s a visible gap, the seal is twisted, installation was rushed or done in the cold | If the deflector is cracked or its shape clearly doesn’t match the frame |
| Several slow window cycles and window regulator reset | After correct seating the window almost closes, but the electronics are out of sync | If the accessory physically hits and blocks the window travel |
| Drain cleaning and checking the lower part of the door | Water accumulates in the door or moisture appears below the window line | If the issue appears only in the upper corner immediately after installing the deflector |
| Window adjustment or seal replacement | The window presses unevenly; the seal is old or damaged | If everything was watertight before the deflector and the symptom appeared immediately |
| Replacing the kit with a more precisely fitted one | After correct installation a structural gap or whistling remains | If the real cause is clogged drains or misaligned glass |
| Silicone, extra tape, local shims | Only as a short-term measure until a proper reinstall | For a long-term fix this is usually a waste of time and money |
From a customer’s experience: after installing rear in-channel deflectors, water appeared in the upper corner of the door, and at first they tried to seal it with silicone. After removal, it turned out the edge was sitting under the inner seal instead of on the outer lip. Reinstalling in a warm bay and cleaning the channel eliminated the gap without replacing the glass or the door seal.
Conclusion
Gaps and water near in-channel deflectors almost always come down to three things: incorrect seating, poor kit geometry, or the issue isn’t the accessory at all but the glass, seals, or drains. So the smartest path is proper diagnostics first, then reinstalling under the right conditions, and only then replacing parts.
This material is based on real selection experience, hands-on practice, and real-world usage scenarios: in most cases, what helps isn’t sealant, but accurate fitment and checking related components. If you see that the deflector physically won’t sit to the frame or constantly triggers window bounce-back, don’t fix the consequence—replace the cause.
How it works
- Check exactly when the water appears First, determine whether the leak occurs only with the window slightly open, or even when it is fully closed. If water only gets in when the window is open, the cause is often the deflector fit or profile; if it also happens when closed, check the glass, seal, and door drains.
- Inspect the deflector fit Check whether the edge of the deflector sits on the correct lip and whether the seal has twisted. The gap often appears because the accessory is seated too deeply, crookedly, or under the inner seal.
- Remove and clean the channel If you see dirt, moisture, or adhesive residue, the deflector needs to be removed and the channel cleaned. Installation on a dirty or damp surface often leaves a gap and prevents the accessory from seating properly.
- Reinstall in a warm, dry place A dry test fit and reinstallation in a warm room provide a better fit than trying to press everything into place on the car. For adhesive elements, follow a temperature of no lower than 10–15 °C and do not touch the glass for 12–24 hours or longer if the kit requires it.
- Check the window travel and drains After installation, slowly raise and lower the glass several times without using the automatic mode so it seats properly. If water collects below the glass line or you hear sloshing, clean the drain holes and inspect the seals and door components.
- Fix the cause instead of using sealant Silicone, extra tape, or closing the window tighter usually only provide a temporary effect. If a design gap or whistle remains after proper installation, it is better to replace the kit with a more precisely fitted one rather than masking the gap.