31.05.2026
303
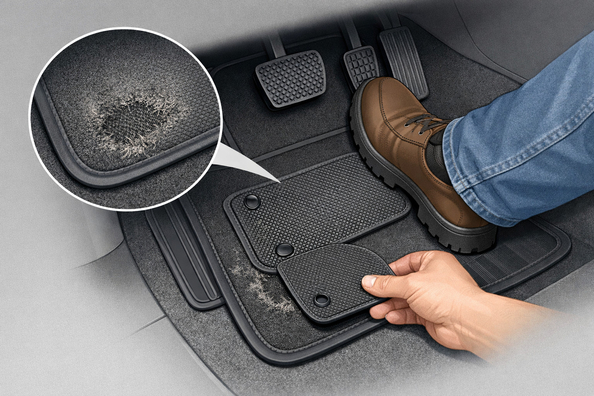
If the driver’s floor mat wears through under your heel faster than you expected, the problem is almost never “bad mileage,” but rather a combination of point load, foot rotation between the pedals, sand, and a less-than-perfect fit of the mat itself. That’s why the wear is local: first the pile gets crushed, then a bald spot appears, and then a hole.
The good news is that you can usually identify the cause in a few minutes without a service visit. And the right fix is usually simple: either stabilize the mat and remove abrasive dirt, or switch to a material and reinforcement that can handle your seating position, footwear, and driving pattern.
The driver’s heel doesn’t act like a static weight—it works as a pivot point. When you move your foot from the gas to the brake, it presses in one spot and slightly twists at the same time. If there’s thin pile, a layer of grime, or the mat is shifting, friction increases sharply.
This shows up fastest on textile and universal mats without reinforcement. On rubber or TPE, wear progresses more slowly because the material handles moisture, snow, and salt better and doesn’t abrade as quickly at the support point.
Lift the mat and look not only at the hole but also at the underside. If there’s a lot of dust, sand, and a slippery film underneath, the issue is partly abrasive dirt and slipping. If the mat is shifted relative to the factory clips or sits at an angle, wear is almost guaranteed to accelerate.
Next, sit in the driver’s seat in your usual shoes and place your foot the way you do while driving. Check exactly where your heel rests, whether it hits the edge of the reinforcement, and whether the mat sits too close to the pedals. After washing, detailing, or service, repeat this check, and before driving always cycle the pedals through their full travel.
DD Tuning expert comment: the most common mistake is looking for a “stronger mat” without checking why the previous one wore out. If the clips are broken, the floor under the mat is dirty, or there’s another mat on top, the new set will start wearing the same way. The second typical mistake is placing the heel pad too high or too close to the accelerator pedal.
| Symptom | Likely cause | What to do |
|---|---|---|
| The pile is crushed and balding only in one spot | Constant pressure and heel rotation in the same place | Add reinforcement at the support point or replace the mat with a more durable material |
| Wear returns quickly after cleaning | The mat shifts or isn’t secured | Check the clips, anti-slip backing, and clean the floor under the mat |
| Black dry residue under the heel, pile feels rough | A lot of sand and dry abrasive | Shake out the mat and wash the floor under it more often |
| A hole appeared very early on thin pile | Weak material or universal sizing | Switch to a vehicle-specific rubber, TPE, or reinforced textile mat |
| Your heel catches the edge of the pad | The heel pad is thick, shifted, or not suited to your seating position | Reposition the pad, reduce thickness, or skip it altogether |
| The mat slips under the pedals | Wrong size or double-layering mats | Immediately remove the extra mat and reinstall the set correctly |
If your car has a floor-hinged accelerator pedal or a very specific foot support point, universal pads often lose out. In that case, precise reinforcement matched to the mat’s shape works better.
If the wear is localized and the mat still holds its shape, it makes sense to reinforce only the working zone. For that, it helps to first evaluate materials for car mats and understand whether your current surface type can handle a separate heel pad.
When the mat already slips, has lost its shape, or gets damp quickly in winter, it’s smarter to switch to rubber mats. If you need localized reinforcement without a full replacement, it’s worth separately understanding why you need a heel pad and how to position it correctly.
A full replacement is needed when not only the top fabric but also the backing is worn through, the mat has deformed, or it no longer stays secured. In that situation, patching only delays the expense.
| Solution | When it works | When it’s not worth spending money |
|---|---|---|
| Separate heel pad | When wear is point-specific and the mat backing is still intact | When the mat is already deformed, slips, or the pad interferes with foot movement |
| Deep cleaning of the mat and floor | When the cause is sand, dust, and loss of grip | When the material is already worn through to the backing |
| Restoring factory clips or retention | When the mat constantly shifts | When the mat itself doesn’t match the floor shape or size |
| Switching to a rubber or TPE mat | When the car is often driven in mud, snow, and with wet footwear | When the main problem isn’t the material, but poor fitment or broken retainers |
| Local patch or DIY pad | As a temporary option until replacement | When you need a long-term solution or there’s a risk of the heel catching |
| Full set replacement | When there’s a hole, deformation, slipping, and lost geometry | When the problem is only in a small wear zone and the mat can be reinforced properly |
From a customer’s experience: a driver came in after the second winter, when the textile mat already had a depression under the heel, and a new identical set would have worn the same way. After inspection, it turned out the mat was shifting slightly and sand was accumulating underneath. As a result, he switched to a stiffer mat with retention and added reinforcement at the support point, after which the wear stopped progressing so quickly.
Rapid heel-area wear almost always has a specific cause: abrasive dirt, mat shifting, weak material, or poorly chosen reinforcement. So you should start not with a random purchase, but with a quick check of fitment, retention, the condition of the floor, and your foot’s support point.
The best result usually comes from a combination of a properly selected mat, a clean base, functioning retainers, and a heel pad where it’s truly needed. This material is based on real fitment experience, practice, and real use scenarios, so the main advice is simple: eliminate the cause of wear, not just cover up the hole.
Shipping to EU
Wholesale and retail
Own warehouse
Опис продукту
Подарунки не надаються при оформленні покупки у кредит під 0,01% або при покупці частинами.