10.05.2026
272
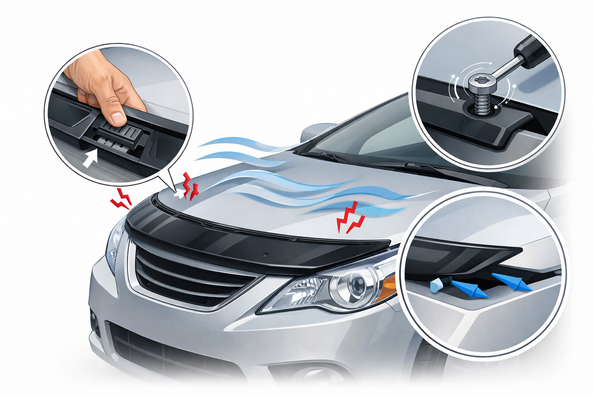

If a hood deflector starts whistling, vibrating, or making a dull flapping sound on the highway, the problem is usually not that “the wind just works like that.” Most often, the noise appears because of an incorrect fit, loose mounting, or an altered airflow that begins to move not only the deflector itself, but also the rear hood seal, the edge near the windshield, or a side molding.
The quickest check is simple: temporarily remove the deflector and repeat a short drive at the same speed where the noise appears. If it becomes quiet, the cause is the accessory itself or its installation. If not, you need to look at the hood, seals, and gaps.
A deflector changes the direction of airflow over the front edge of the hood. If its shape, height, or angle doesn’t match the geometry of a specific car, the air doesn’t go smoothly upward and instead creates turbulence. At speeds of roughly 100–130 km/h, this can turn into a whistle, fine vibration, or even noticeable hood shake.
The second point is that the noise is often not born in the plastic itself. The deflector only changes the flow, and that flow then lifts a weakened seal, molding, or the hood edge. That’s why two identical accessories on different cars can behave differently: one will be quiet, the other will make noise already at 110 km/h.
DD Tuning expert comment: The most common mistake is immediately adding another layer of tape or sealing everything with silicone without checking whether the deflector itself is noisy or whether the seal near the windshield is already moving. If you have a few minutes, it’s much smarter to remove the part and repeat the drive at the same speed. The second typical mistake is installing the accessory on a cold or wet surface, after which the mounting starts to shift exactly on the highway.
| Symptom | Likely cause | What to do |
|---|---|---|
| Whistling after 100 km/h | Poor geometry or misalignment of the deflector | Check the fit, temporarily remove it, and compare how the car behaves |
| Fine vibration of the deflector itself | Loose mounting, fatigued tape, play at fixing points | Tighten the fasteners, reapply quality tape, replace pads |
| Flapping or hood shaking | Airflow amplifies existing hood play or stop play | Check stops, gaps, hood height relative to the fenders |
| Noise as if from under the windshield | Lifted molding or rear hood seal | Inspect edges, temporarily secure the problem area, and repeat the drive |
| Problem appeared after frost or a car wash | Tape adhesion weakened, moisture got under the mounting | Remove it, dry it, properly prep the surface, and reinstall |
What works is what removes the root cause. If the deflector sits crooked or has play, a proper reinstallation helps: cleaning the surface, new tape, correct pressure, checking symmetry. If the noise is not from it but from the hood edge or molding, you need to secure that element specifically instead of fighting the plastic.
On some cars, adjusting the hood stops works well: when the hood moves less in the latch, high-speed shaking becomes weaker or disappears. Another effective option is to add or replace soft pads where the deflector contacts the hood, if the design allows it. But it must be a neat solution without twisting the part.
Silicone along the edges, random double-sided tape, “smearing” the seal, and chaotic shims often give a short-lived effect. On the spot it may seem better, but on the highway turbulence brings the noise back.
Likewise, don’t assume that any new deflector will automatically solve the problem. If the root cause is hood play or the rear seal near the windshield, replacing only the accessory may change nothing.
If the deflector is cracked, warped, doesn’t sit along the hood edge, or it’s clearly an imprecise universal part, it’s easier to replace than to keep re-taping it. In that case, it’s worth looking at hood deflectors, and before buying it’s useful to understand how to choose a deflector and how the tall vs low type differs.
If the deflector is high-quality but the area near the windshield is noisy, the point is not a new accessory but replacing the seal, re-bonding the molding, or adjusting the hood. It’s important not to confuse the product with the cause of the issue.
| Solution | When it works | When it’s not worth the money |
|---|---|---|
| Reinstalling the deflector | There’s misalignment, weak pressure, old tape, or an uneven fit | When the part’s shape is simply not suitable for this car |
| Replacing tape and pads | The mounting loosened after cold, moisture, or a car wash | If the noise comes from a molding or the seal near the windshield |
| Adjusting hood stops and gaps | There is hood shake at speed | If only the deflector vibrates without the hood moving |
| Securing or replacing the seal, molding | The noise is localized near the windshield | If the problem completely disappears after removing the deflector |
| Replacing the deflector with a vehicle-specific one | The old part is crooked, cracked, or doesn’t fit accurately | When the root cause is in the hood design, not the accessory |
From a customer’s experience: a driver came in complaining of flapping after 110 km/h and was sure the problem was the hood itself. After a short drive without the deflector, the noise disappeared, and inspection revealed weakened adhesive tape and a lifted molding edge near the windshield. After reapplying the mounting and securing the molding, the deflector was put back in place, and the symptom did not return on the highway.
When a hood deflector makes noise or vibrates, don’t start with random shims and sealants. First separate the cause: the accessory itself, its installation, hood play, or a problematic seal near the windshield. The best sequence is inspection, a short drive without the deflector, checking gaps, and only then repair or replacement.
This material is based on real experience with selection, hands-on practice, and real-world use scenarios: that’s why the key advice here is simple—don’t treat the noise blindly; localize the source and spend money only on the solution that truly works in your case.
| ✔ | The quickest way is to isolate the deflector itself from other sources of noise: just remove it and repeat the drive at the same speed. This saves time and does not force you to replace working parts right away. |
| ✔ | The article provides a clear inspection algorithm: check the mounts, seals, hood gaps, and the edge near the windshield. This approach helps localize the source of whistling or vibration instead of acting blindly. |
| ✔ | It explains when reinstalling, new tape, pads, or adjusting the hood stops can actually help. This lets you choose a specific solution depending on the symptoms, rather than replacing the accessory unnecessarily. |
| ✔ | There is a practical distinction between noise from the deflector and noise from the molding or the rear seal. This matters because the problem often turns out to be not in the plastic, but in the element it only amplifies. |
| ✔ | It separately points out common mistakes after frost, washing, or installation on a dirty surface. This makes it clear why the fastening can start to loosen specifically on the highway. |
| ✘ | If the deflector has poor geometry or does not fit a specific car, simply sticking it down will not solve the problem. In that case, you will either have to put up with the noise or replace the part itself. |
| ✘ | Some methods give only a temporary effect: silicone, random tape, or improvised shims may help on the spot, but at speed the noise often returns. This means that cheap quick fixes are not always worth it. |
| ✘ | If the cause is hood play or a raised molding near the glass, replacing only the deflector will not change anything. The related elements will also need to be repaired separately. |
| ✘ | After removing the deflector, it may turn out that the noise remains, meaning the real cause is not the accessory. Then the diagnosis takes longer, because the hood stops, gaps, and seals need to be checked. |
Shipping to EU
Wholesale and retail
Own warehouse
Опис продукту
Подарунки не надаються при оформленні покупки у кредит під 0,01% або при покупці частинами.