26.08.2026
159
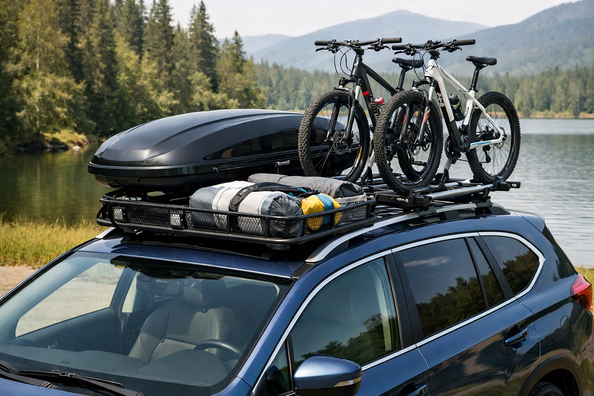
This plan is for owners of cars with integrated roof rails who are heading on vacation and want to move suitcases, a stroller, sleeping bags, kids’ items, or camping gear out of the cabin. If the task is simple—give passengers more space without chaotic purchases—the sequence is just as simple: first compatible crossbars, then a luggage box, and only then narrow, scenario-specific accessories.
The main mistake in this scenario is buying a good-looking box or basket before checking the verified roof limits, the shape of the integrated rails, the spacing between the crossbars, and the clearance to the tailgate. For different body styles, generations, and types of fifth doors, the result can differ very noticeably.
In a vacation scenario, the roof needs to solve two tasks: move light but bulky luggage out of the cabin and not make the car uncomfortable on the highway. It makes sense to put clothing, sleeping bags, travel duffels, skis, or other long gear on the roof. Heavier items are best kept lower—in the trunk or cabin—so you don’t raise the center of mass.
For cars with integrated rails, you should look specifically at the allowable load while driving, not random numbers from forums. Roof limits, rail geometry, and the permitted distance between crossbars vary by vehicle, so the same system can behave differently on two similar crossovers.
The first step, with no real alternative, is compatible crossbars for your type of integrated rails. These are what a roof box or basket mounts to; you don’t place cargo directly on the roof panel. Three checks matter here: the fixing method, the rated load of the crossbars, and the real spacing between them.
The second step is choosing the carrying format for your luggage. For a family vacation, a roof box around 450–500 L most often wins: it clears the cabin and protects items from rain. If the cargo is wet, dirty, or non-standard, an open basket is more practical, but you’ll have to accept greater exposure to weather and airflow.
| Upgrade | Why it’s needed | Who truly benefits |
|---|---|---|
| Compatible crossbars for integrated rails | Create the base for any roof load and provide the correct mounting | Everyone without exception who plans to carry anything on the roof |
| 450–500 L roof box | Moves light bulky luggage out of the cabin and keeps it covered from precipitation | Families, long trips, travel with children’s items |
| Open basket | Allows carrying wet, dirty, or non-standard gear | Camping, fishing, trips with equipment you don’t mind getting wet |
| Low-profile roof box | Reduces extra height and is usually more pleasant on the highway | Those who drive long distances often or have parking height limits |
| Narrow roof box or a dedicated gear holder | Keeps part of the roof free for a second working accessory | Those combining luggage with a bike, skis, or other gear |
DD Tuning expert comment: The most common mistake is this: people order a large box “for margin,” then discover it hits the tailgate or doesn’t fit the crossbar spacing. Another typical story is buying quiet, good-looking bars without checking their real load rating. Before paying, always confirm the rail type, roof limit, and actual measurements on your car.
In the second stage, it’s better to add not an even bigger box, but specialized items for a specific type of vacation: a bike rack, ski rack, a solution for a board, or other long gear. This works when the basic pair of crossbars and the main container have already covered the main task.
But roof width matters here. On narrow cars, one box can take up almost all usable space, and a second accessory simply won’t fit next to it. That’s why a combined setup should be planned after the first measurement, not from a catalog picture.
Comfort-focused, not first-priority upgrades include aerodynamic crossbars, dual-side box opening, quick-release mounting, and a lower shell profile. These things don’t add liters by themselves, but they save installation time, make loading in a parking lot easier, and usually annoy you less with noise.
This also includes choosing the box shape. A low option is useful for those who drive highways and don’t want extra centimeters of height at parking garages, car washes, and barriers. A narrow sporty format is not for looks, but for when you need to keep space on the roof for another practical accessory.
Most often, people buy the biggest possible box “just in case.” If it interferes with tailgate opening, doesn’t match the crossbar geometry, or carries air most of the year, that’s not a reserve—it’s extra volume at your expense.
The second typical mistake is overpaying for appearance. Expensive low-noise bars, a glossy shell, or an expedition-style basket make no sense if the car goes on vacation twice a year and the entire need is transporting suitcases. People also often buy a second roof accessory for nothing without checking whether it will fit next to the box at all.
| What to install first | What can be postponed | What is not required |
|---|---|---|
| Compatible crossbars, checking the roof limit and tailgate clearance | Premium quiet crossbars if you carry luggage rarely | Decorative solutions without a new function |
| 450–500 L roof box for dry luggage or a basket for dirty and wet gear | Dual-side opening and quick-release installation | The biggest possible box just “for reserve” |
| Packing strategy: light and bulky on the roof, heavy lower in the car | Narrow specialized format for a mixed-use scenario | A second roof accessory if the roof is narrow and there’s no space next to the box |
More expensive solutions are justified when the roof system is used often, not once a season. If the crossbars will stay on the car for a long time and you regularly drive highways, it makes sense to look at better crossbars for integrated rails. If the main request is volume and convenience for family trips, it’s worth comparing roof boxes by shape, height, and access, not only by liters.
A premium box makes sense when you’re paying not for a logo, but for quieter travel, dual-side opening, faster installation, and fewer compromises on height. Before overpaying, it’s useful to check which crossbars truly handle a roof box, because part of the budget can easily go into looks instead of real benefit.
From a customer’s experience: for a family vacation, a person initially looked for a large box right away, but after measuring it turned out that a long model would interfere with tailgate opening. In the end, they chose compatible crossbars and a medium-large box, and postponed the idea of an additional roof accessory. The biggest effect came not from maximum capacity, but from the fact that light but bulky items disappeared from the cabin.
For a vacation with a car that has integrated rails, the working sequence is almost always the same: compatible crossbars, then a box or basket for your specific luggage, and only after that specialized holders. If you need a universal family option, a medium-large box usually wins; if the cargo is dirty, wet, or non-standard—a basket.
Don’t buy a roof setup at random or overpay for things that don’t deliver real value in your scenario. This material is based on real selection experience, practice, and real usage scenarios, so the main logic is simple: first what’s needed, then what’s wanted, and everything decorative—last, or not on the list at all.
| ✔ | Compatible crossbars for integrated roof rails provide a proper base for any roof cargo. Without them, a box or basket simply won’t have the correct mounting. |
| ✔ | A box with a volume of around 450–500 l is well suited for a family vacation. It takes light bulky items out of the cabin and protects them from rain. |
| ✔ | An open basket is useful for wet, dirty, or irregularly shaped gear. It’s a practical option for camping, fishing, or transporting equipment that you don’t mind getting wet. |
| ✔ | A low-profile or narrow box is convenient for everyday use on the highway. It adds less height and may leave room for another roof accessory. |
| ✔ | The article gives a clear sequence of steps before buying: first measurements, then choosing compatible crossbars, and only after that selecting a box or basket. This reduces the risk of getting the tailgate, crossbar spacing, or roof load limit wrong. |
| ✘ | A poorly chosen large box can interfere with opening the tailgate or fail to fit the geometry of the crossbars. Because of this, buying “with extra room” often turns into unnecessary expense. |
| ✘ | An open basket protects cargo less well from weather and airflow. For dry items and family luggage, it is less convenient than a closed box. |
| ✘ | Premium solutions such as quiet crossbars, dual-side opening, or quick-release mounting do not add useful volume. If the roof system is used rarely, the extra cost may not be worth it. |
| ✘ | On a narrow roof, a second accessory next to the box may simply not fit. Because of this, a combined setup often has to be postponed or simplified. |
Shipping to EU
Wholesale and retail
Own warehouse
Опис продукту
Подарунки не надаються при оформленні покупки у кредит під 0,01% або при покупці частинами.